

In the first partl I showed you how to install and connect the ambilight-hardware on your TV.
In this tutorial I will show you how to light up the attached led strips, how to do the finetuning so the light behaves as you want it to and how to configure your remote using it to turn your ambilight on and off with it.
This Howto was done using Openelec (optimized operating system for Kodi) in version 5.95.4.
Following parts are included in this howto:
- Activating ambilight-module
- Installing Hyperion – software for color control
- Configuring Hyperion
- Finetuning – adjusting colors, brightness and saturation
- Turning the ambilight on/off using your remote control
- FAQ
What to expect after this tutorial?
Oh yeah, it’s worth it, believe me! 🙂
An entirely new cinema experience awaits you, lets start.
1. Activating ambilight- module
To address the GPIO Pins on the raspberry Pi2 , at first you have to activate a certain module in the config.txt.
Easiest way to edit configs etc. would be to take the SD- card out of the Raspberry and connect it to your PC using a card reader.
Open any text editor, I’m using the Sublime Text Editor – you can find the config.txt file in the root directory of the SD- card.
At the end of the file add following lines:
# activate ambilight module
dtparam=spi=on
That’s how it looks in the editor:
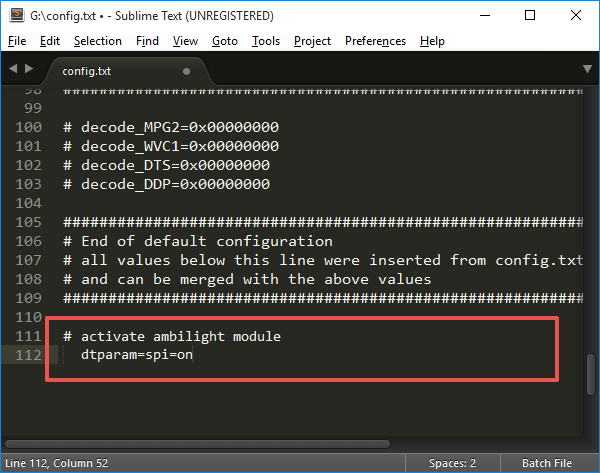
Save the file, and you’re done. 🙂
The ambilight- module is activated now. You can remove the SD- card now and put it back into your Raspberry Pi 2.
2. Installing hyperion – software for color control
Using Hyperion is currently the best method to control the LEDs. This software requires less processing power, works fast, effective and also provides an easy config tool.
To install it in Openelec, you have to connect to your Raspberry using a terminal software like Putty. In case you’ve never done it, here is a Howto for that.
First of all you download the installation script with this command, just copy and paste it in the terminal:
curl -L --output install_hyperion.sh --get https://raw.githubusercontent.com/tvdzwan/hyperion/master/bin/install_hyperion.sh
sh ./install_hyperion.sh
The Hyperion- installation script was downloaded successfully. Confirm it with the Enter Key to start the installation.
If your terminal looks like in the screenshot below, everything works and Hyperion was installed successfully.
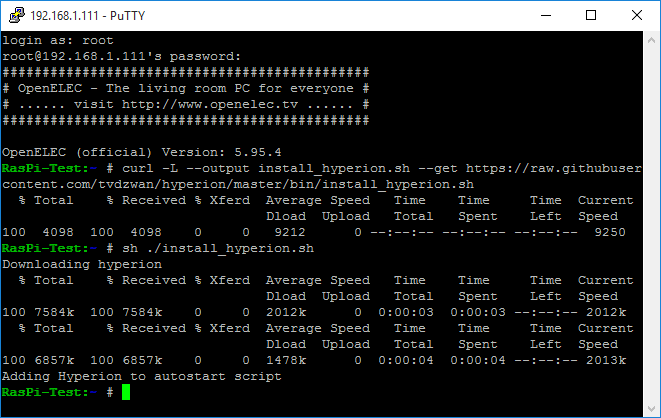
After installation just reboot your Pi using the command “reboot”.
3. Configuring Hyperion
Things are starting to get colorful now. 😀
To assign the correct color values to the LEDs , you have to inform Hyperion about the layout of your ambilight- system.
Thanks to the configuration tool this is very easy to do.
Download the most current version from the developers site:
You may get a security message when downloading. Just ignore and download the file.
Info: n case you cant open the HyperCon.jar , you need to install Java on your computer . Here you can download it.
Count your LEDs!
I counted my LEDs as shown in the following picture. After that I entered the values in the Hyperion config tool.
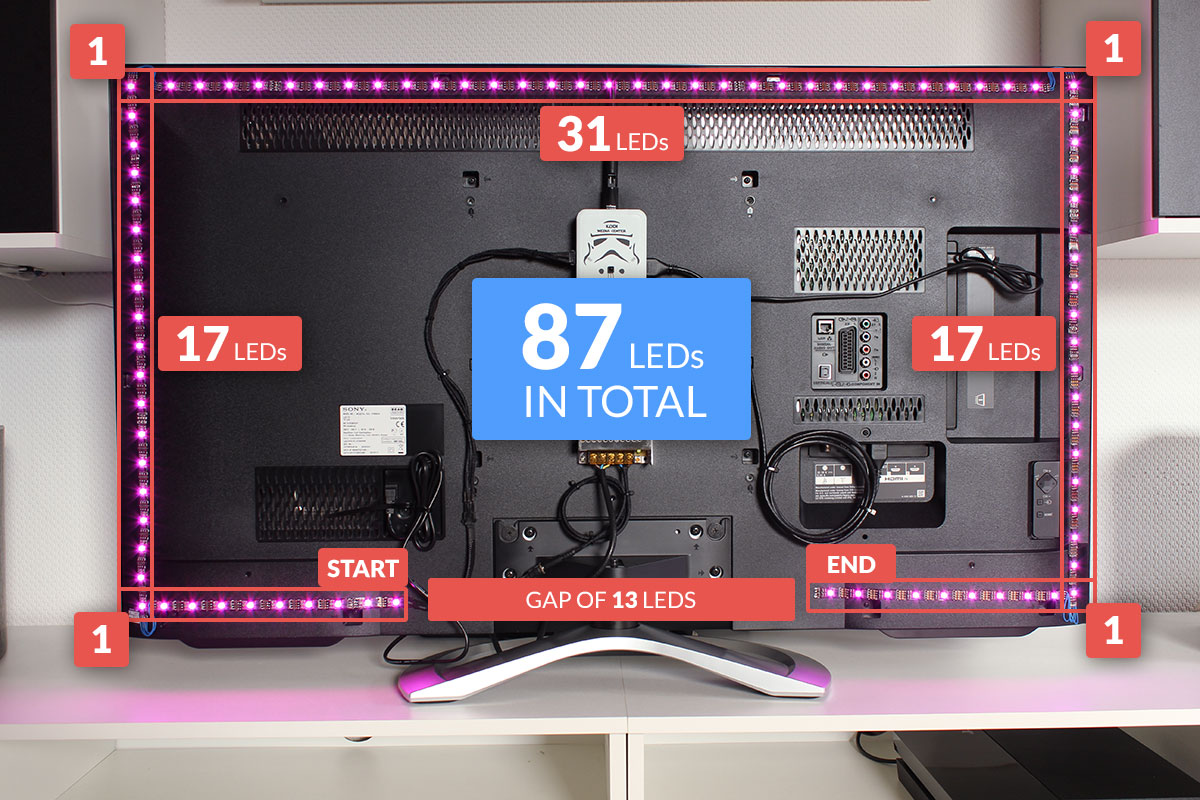 For my setup I used following settings in the config tool.
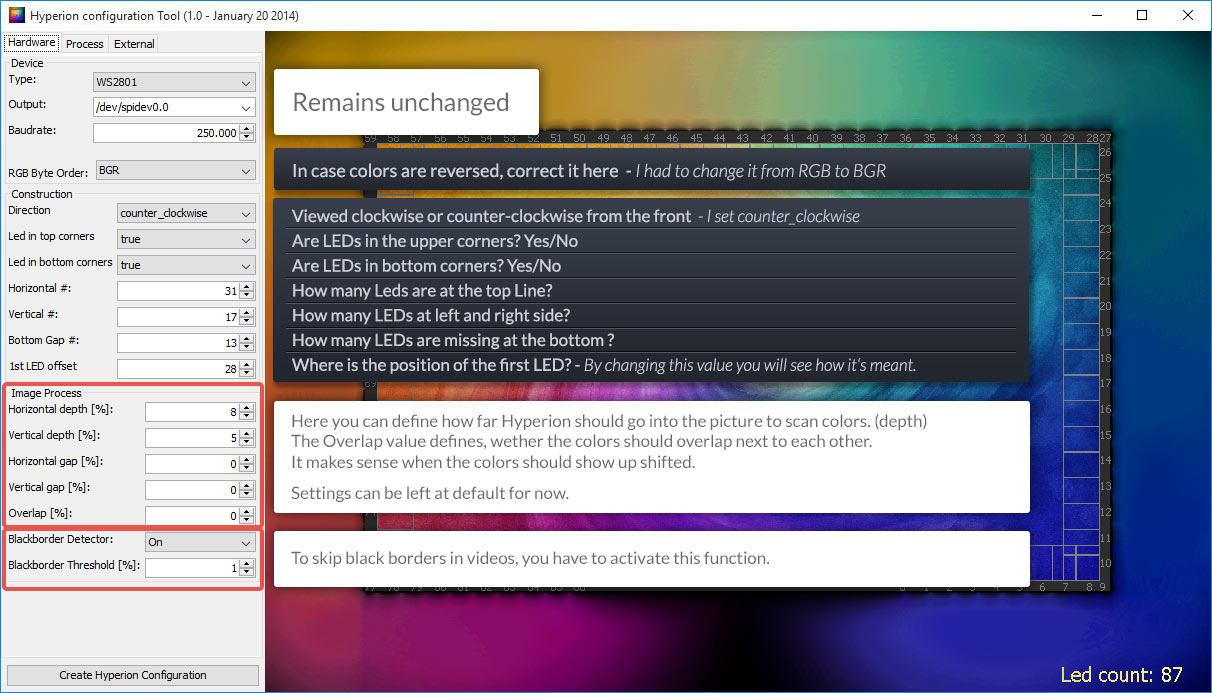
Hardware-settings
Here you can set values like how many leds exist on each side, where the first led is, etc. I explained the settings in the screenshot. 😉
Make sure that the LED count in the bottom right corner is correct, otherwise some LED’s won’t light up later.
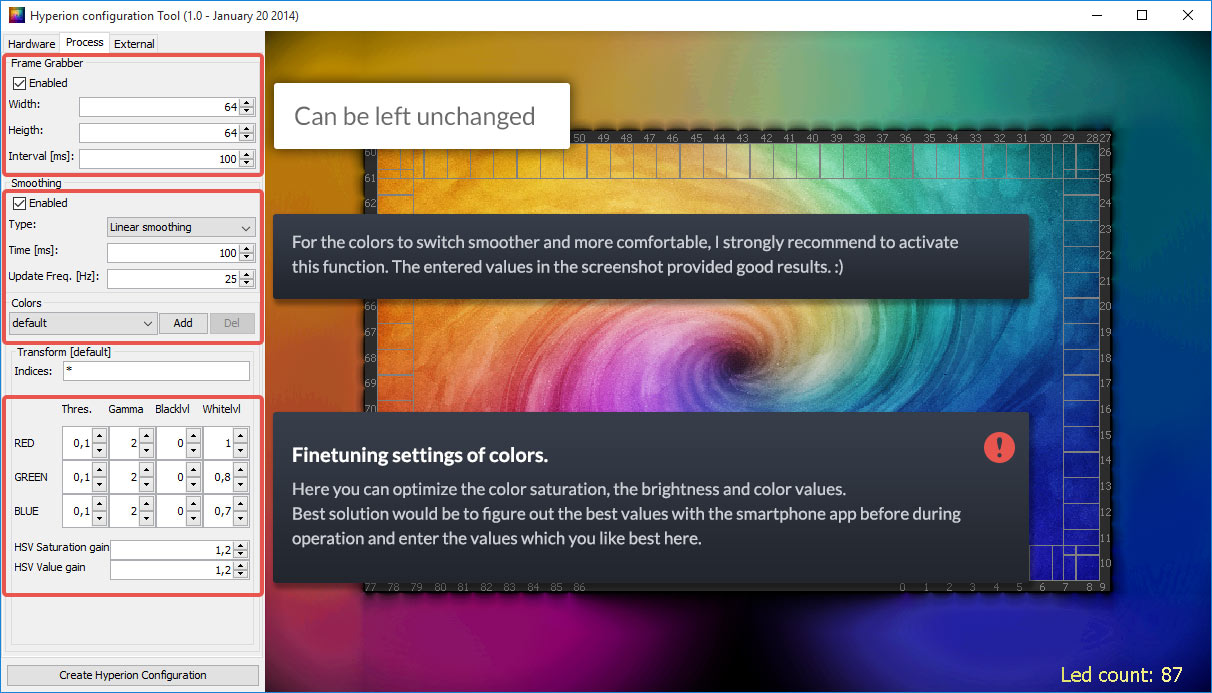
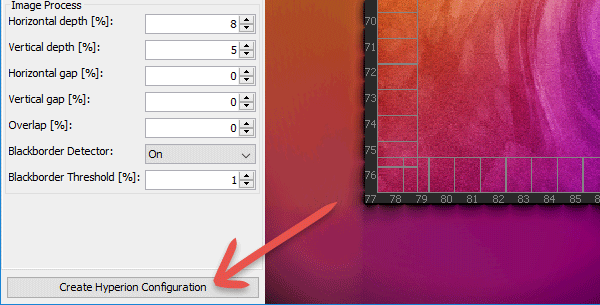
Process-settings
Here you can set brightness, color intensity, color transition and other finetuning. More on this later. 😉
I tried to explain everything as good as I could in the following screenshot:
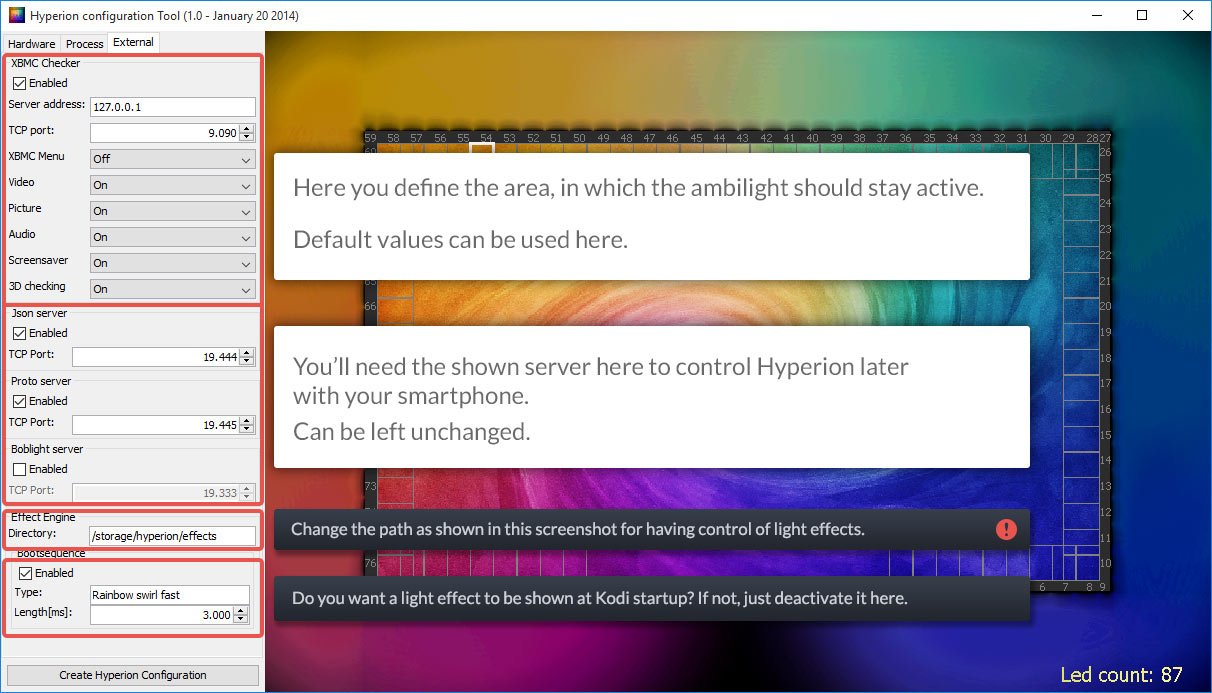
External-settings
Here you just need the last 2 entries.
It’s important to change the path for “Effect Engine” to the shown value on the screenshot.
Create config- file
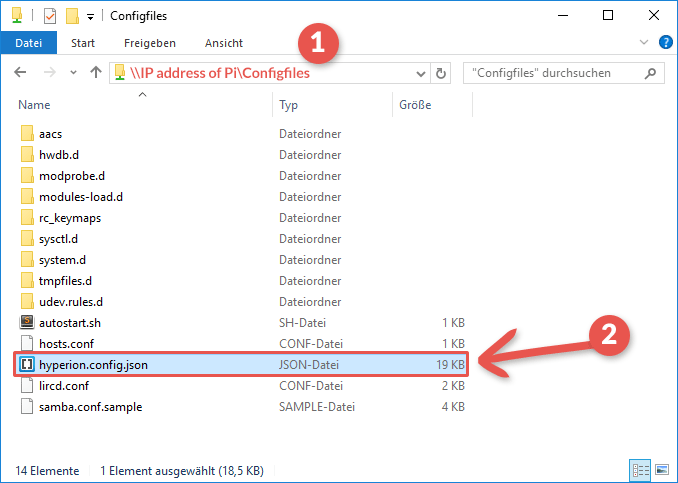
After you’ve done with config, just click on “Create Hyperion Configuration” in the bottom left corner” and save the created hyperion.config.json in the “Configfiles” folder on your Pi.
You can find the “Configfiles” folder easily by accessing the pi in windows by entering the IP like this in the Windows Explorer Address bar: \\192.168.1.111\
Now just reboot you raspberry so it can load the config file. You should see if it worked.

4. Finetuning – adjust colors, brightness and saturation
Colors seem too intense or not intense enough? LEDs are too bright or not bright enough? That’s we take care of now!
Finetuning can be done pretty easy using the Hyperion-App , you can see all changes live on your system.
Attention! All changes you make with the app are just temporary, you can’t save them. You have to note the values , enter them again in the Hyperion- config tool and create a new “hyperion.config.json”.
Hyperion App for Android: Click here
Hyperion App for iOS: Click here
Hyperion App – Set up connection
At first you have to connect to Kodi to get control of it. Therefore you need the IP address of your raspberry Pi.
Just follow the instructions as seen on the screenshots:
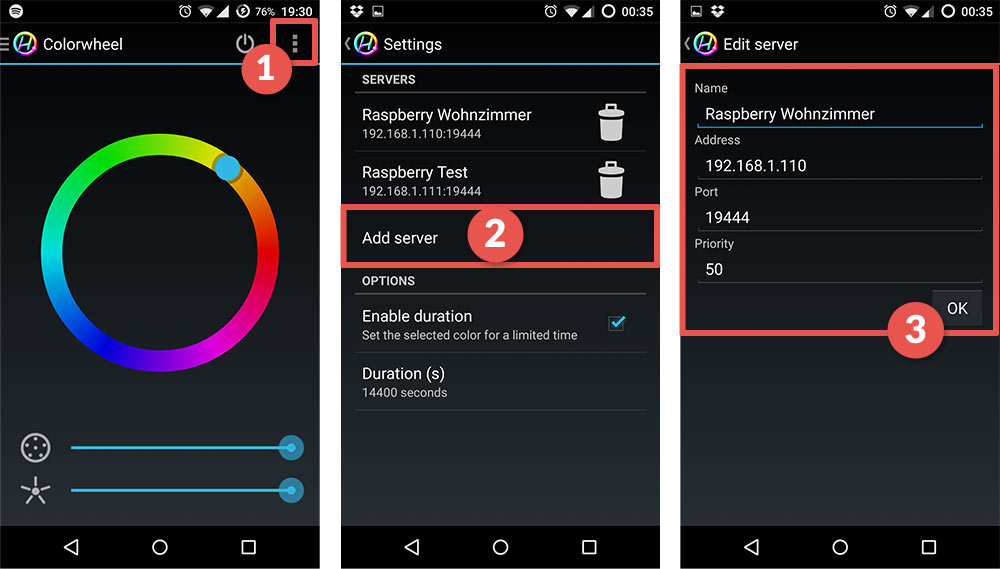
After connection is stablished , you can control all colors directly from your phone.
Probably you’re busy for a while now playing with the colors. 😀
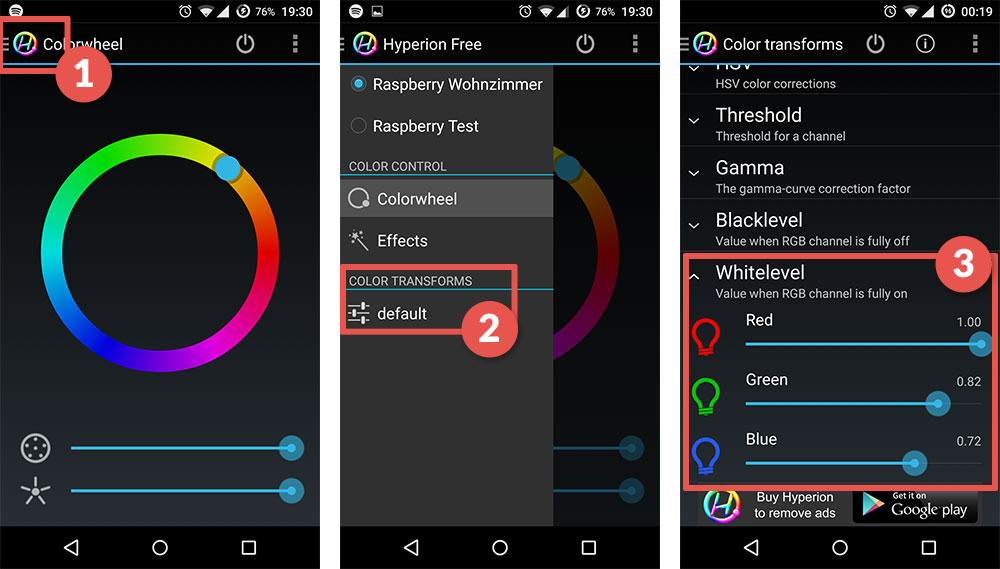
Adjust whitelevel
For the colours to harmonise together well, it’s important to set the white tone near to the white tone your TV has.
Other colors like red, green and blue are not that important to adjust, because the effect is minimal and not conspicuous.
I created a package for you with all colors , which you can use to test and adjust.
Download: ambilight_test_images.zip
Save this pictures on your Pi and open the white picture.
Now you can change the white tone in the hyperion app, till it’s similair or just the same to the TVs white tone.
On this screenshot you can see the values i set for a good result.
These values gave me this result:
Set brightness and saturation
Here you can find these settings. Just set them as you like it best. Best solution is to play a movie and play with some values till it looks best for you.
 That are the most important settings. You can play around with other settings as well and test what gives you the best results for your setup.
Again, as already written, all changes you make with the app won’t get saved. You have to put the values into the Hyperion Config tool and create a new config file. 😉
5. Turning the ambilight on/off using your remote control
To control your ambilight with a remote control, please follow my instructions in this section.
Download and unzip this little script.
Put the unzipped hyperionswitch.sh file into the Userdata folder on your Kodi.
You can access this folder by entering the IP of your PI2 like this in the Windows Explorer Address bar: \\192.168.1.111\Userdata\
Just paste the file here.

There is a subfolder “keymaps”, wich contains either a file named “keyboard.xml or “remote.xml”, which you can edit using a text editor.
If you can’t find one of this files, you have to create it first. You can find more about this in this howto.
I created a remote.xml and assigned the Power-key to turn on and off the ambilight:
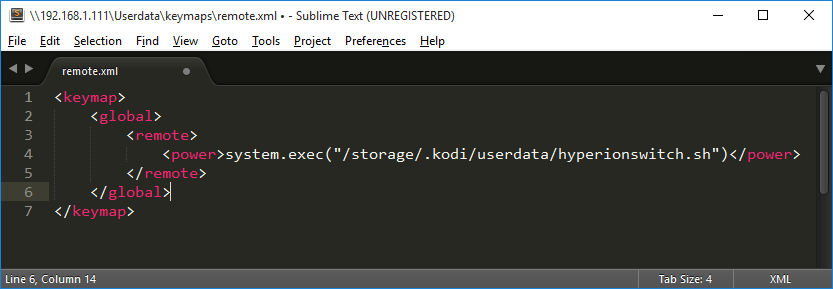
To avoid mistyping, just copy the code:
system.exec("/storage/.kodi/userdata/hyperionswitch.sh")
Once finished, just restart your Raspberry 2. Now your Key should have the wanted function.
6. FAQ:
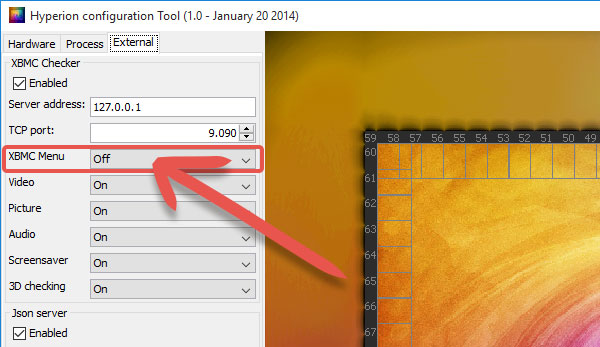
My ambilight should only activate when a video starts, not in the menu, how to configure?
At first you have to turn off the light in menu using the Hyperion config tool, as shown in screenshot:
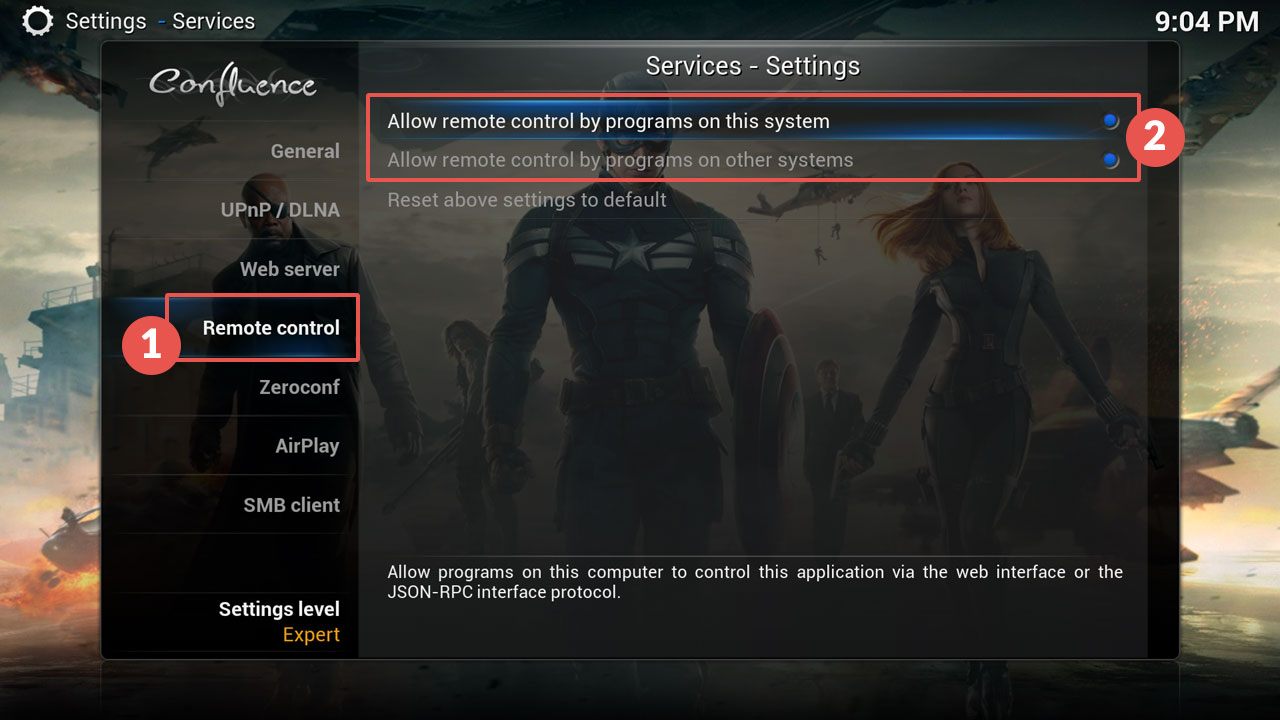
Afterwards you have to activate remote services in Kodi settings.
You can find it in Options → Services → Remote control
It’s important to turn on both options.
Now the LEDs are just lighting up at the start of Kodi and immediately go off as long you are in the menu.
Of course they activate in Video mode again..
If you have any questions, i like to help you in the comments. 🙂
Have fun reproducin and post your results.


Any help appreciated.
I ordered this power http://www.aliexpress.com/item/free-shipping-1-Pcs-5V-6A-30W-Voltage-Transformer-Switch-Power-Supply-for-Led-Strip-Light/32437570302.html and these leds http://www.aliexpress.com/item/DC5V-5M-WS2801-32leds-m-5050-RGB-Addressable-LED-Strip-Arduino-development-ambilight-TV-12mm-led/32595888388.html
after installing it only half of the leds burn.
strangely the very last LED also burns.
So it’s total 90 leds but only the first 45 burn and the very last led (number 90).
what can this be!?
half of the leds work fine also with hyperion. i can change the colors with the app as well.
is it s power issue? ground issue? other issue?
Thanks for a quick response.
Solved!!!!
It was the hyperion config. Apparently (in the new version you can SSH the config straight from Hyperion on your pc to the pi) the config file was not sent to the proper directory. So the config file never got properly updated.
Now it’s working!!!!
Maybe you can still help me out.
I have often light flickering. I’ve been playing with settings for about 4 hours now!
Can you maybe share your json file? Or help me out?
I don’t want the leds to be too bright because for most movies I watch it’s too distracting. But it almost seems like if they are near off they flicker much more.
Thanks for helping.
I am having same problem. so can you tell me how you fixed it. I am using newer version of hyperion.
Sorry I’m sending a message again but it’s because I have so many updates :).
After spending hours to get proper lighting (I want it to be subtle and as accurate as possible) and trying to get rid of the flickering I thought of connecting a ground wire at the end of the led strip to the same ground of the power supply. So now it’s grounded from both sides, and guess what? That solved the flickering!!!!
So apparently with 90 leds it’s needed (at least in my experience) to also connect a ground wire at the very end of the led strip.
You may put this in your manual as well.
I’m putting up a webpage of my own with some info on how I managed to get ambilight working and I’m sure gonna mention this as well. And of course I’m going to link to your manual as that’s how I got the basics 🙂
Can u please share the link of ur webpage.
Thank you for this guide.
I have an issue where only the first LED is working on my strip. I soldered all the corners of the strip together and so I may have made a mistake on one of the connections. Would this cause this issue though?
Also, is there a way to verify that Hyperion is installed correctly? I had issue initially with the installation.
Thanks
I have the same problem. Just only 1 side is light up and the rest not. Did you fix your problem?
Thanks,
Not yet.
I’m going to have another crack at it at the weekend, so will let you know if I figure anything out.
Did you ever find anything? I have the exact same issue.. only the strip that is directly connected to the pi works, but the rest don’t..
Just wanted to update that the issue for me was wiring the led strips in the wrong direction (meaning the flow-arrow pointed backward instead of forward). After fixing that, all is well 🙂
Any1 managed to fix problem only 1 led glows and thats it?
Wait a minute, how can I supply the PI with video if I am already supplying the TV? Did you use some kind of hdmi multiplexing?
Does this only work with KODI, or is it any HDMI input?
That’s what I don’t understand exactly either…
It works with Raspeberry pi 3?
Hello good tuturial thanx, Is there a way to do that with pi zero? I couldn’t find any documantation. Please help. Or I will gonna buy orange / banana pi 🙁
not working I worked at first and then I did not try again I installed it from scratch and now I am not what I did -(daha önce çalıştırdım kodi de sorun cıkınca sıfır kurulum yaptım ama artık nedense hiç çalışmıyor )
Hey guys, can anyone please help me with installation? Here is the situation: I connected ws2812b led strip with arduino uno, arduino uno with raspberry pi b+ via usb, video grabber to raspberry and on video grabber hdmi2av adapter. I made config files by the instructions and when i turn everything on, leds only turns on for about 10sec and then they turn off…what could be wrong? I have tried several openelecs, different arduino sketches and nothing worked. It seems like arduino is getting some information from raspberry, because when I connect video grabber to rspb, on arduino starts red light flashing as it would processing something. Any suggestions?
I’m having trouble with my install, I cannot get the LEDs to respond or display the startup effect.
I have now tried installing Hyperion on OSMC, OpenElec and Rasbian with the same results.
I initially had some success and was able to change the colours from HyperCon but I cannot achieve this anymore, the LEDs stay off.
I believe I am getting sufficient power to the strip (a test run of only 21 LEDs) because they light up briefly when plugging the power in before connecting to the Pi.
My logs seem to show Hyperion running correctly and making changes to colours / displaying effects but it does not output to the LEDs.
I am not attempting to respond to HDMI input yet, I just want to get the colour wheel working again.
Is it possible to build the same control function with Android TV box instead of Raspberry Pi? How?