
Kodi is still not running smooth on your Raspberry Pi 2? In that case I have some valuable tuning tips for you for increasing performance in Kodi significantly.
I use Kodi on my Raspberry Pi almost on a daily basis and therefore I try to get the maximum performance out of the little microcomputer. I collected the best tips and provide them here in the article. I’m sure, that some of you could use some of the tips provided here. 🙂
1. Overclocking
Not really that much of a secret, but recommendable anyway. More clock = more performance. Your Raspberry is clocked with 900 MHz by default. It souldn’t be a big problem to clock it to stable 1GHz. Even I run my Pi 2 at 1,1 GHz without any problems.
The overclocking is done pretty fast and easy. You just have to do some changes in the config.txt , and you’re done.
You can find a detailled manual in this article: How to Overclock Your Raspberry Pi 2 to 1,1 GHz
2. Deactivate RSS newsfeed – WRONG!
Update: Please let the RSS newsfeed activated. From personal and other peoples experience, the main menu runs faster when you leave the RSS feeds activated.
The reason for this is pretty simple. The feed keeps the picture in motion and FPS are high all the time. If you deactivate the RSS feed, the FPS drops , because nothing moves on the screen. If you start to do something in the menue, you will experience a delay of some ms, because FPS has to raise again.
3.Use NFS network shares
In case you access your media through network, I highly recommend to share data using NFS networking protocol.
If you have the same Synology-NAS (US/UK) as me, the set up is done pretty fast. Here you can find a Howto from the manufacturer.
Because NFS is supported natively by Linux, the file transfer is more stable and faster. Movies start faster and skipping through long videos is accelerated.
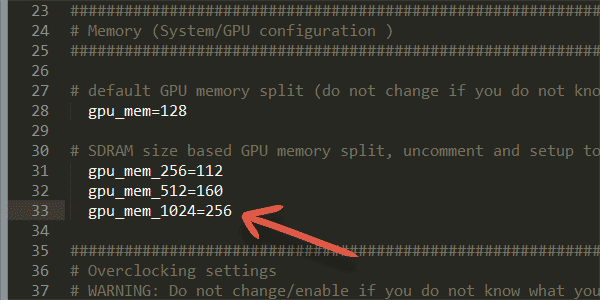
4. Assign more memory to graphic processor
Kodi is very consuming when it comes to graphics, since the graphics processor has to process and display many pictures. Especially when you have a big video collection.
(lots of fanarts, covers, photos of actors etc…)
Because the Raspberry Pi 2 has more than enough RAM, you can take something from it and assign it to the graphics processor.
320MB turned out to be recommendable. To assign this value you will need to find the entry gpu_mem_1024=256 in the config.txt and change it to gpu_mem_1024=320.
5. Deactivate CEC if you’re not using it
You’re using a separate remote control with your Pi? Then why let the CEC-service running and consuming performance in the background?
Here you can disable it: System → System → Input devices → Peripherals

6. Using good hardware
The Wifi adapter and the SD-Card have a great impact on performance in Kodi. I highly recommend to use a fast Class 10 SD-Card. By using Class 10 data can be read faster and bootup process will be much faster. A very popular and recommendable Card would be : this 8GB SD-Carte from Sandisk (US/UK).
In case you’re not using a netwotk cable for your internet connection, make sure you get a fast wifi adapter. As a result videos will load faster (without much buffering) and skipping through bigger video files doesn’t cause any problems anymore.
You can find recommendable wifi adapter in this article: The best Wifi USB adapter for your Raspberry Pi 2
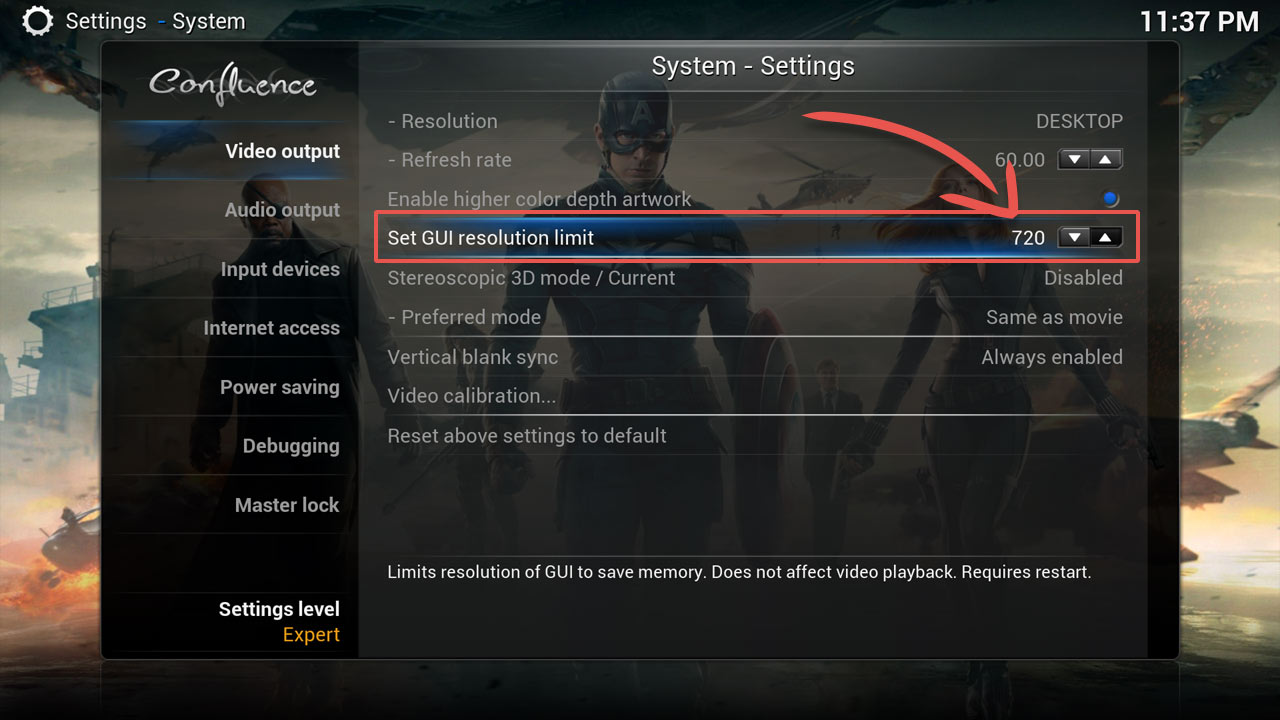
7. Limit the screen resulution to 720p
I expect, that you use Kodi on on a Full-HD (1080p) TV and the user interface is set to this resolution also.
To save some performance, you can set the user interface resolution to 720p. Just try it out. In some cases you won’t feel a difference. In my case the performance boost was noticeable, it runs smooth and without any lags. 🙂
No worries, you only change the resolution of the menu itself in Kodi. Video files remain unaffected by this setting and run as usual in their original resolution.
Here you can change the resolution: System → System → Video output
8. Deactivate automatic scan of tag-informations
If you’re using a big music collection with Kodi, you’ll get a loading bar every time you access all your music folders, because an automatic process scans for all ID3 tags every time.
If you don’t neet that much meta-info, you can disable this function.
To disable it, just navigate to: System → Music → File lists and deactivate the function “Enable tag reading“.

9. Increase video-cache
To play videos from network sources fluently, the content needs to be preloaded. How much of it gets preloaded, you can determine with cache-size.
Sometimes it’s an advantage to increase the video-cache value, especially when you have a slow network connection. Playback won’t be interrupted too often.
But attention! By increasing this option your network load will be higher, because data has to be buffered.
You can find the settings for video-cache in the advancedsettings.xml file. This is located in the “Userdata” folder and has to be created if not already done before.
Here you have to create/put the advancedsettings.xml (reffered to Openelec):
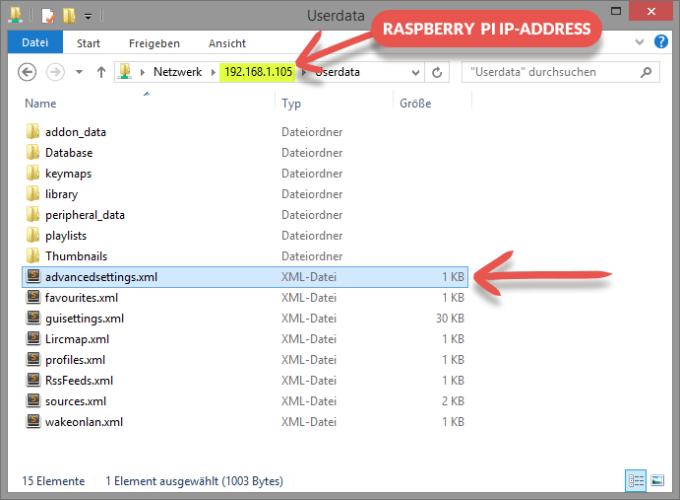
I already created a finished advancedsettings.xml with optimized values ready to use for your Raspberry Pi 2.
Just put it into your Userdata folder , reboot your Raspi, and settings will be applied.
Download: advancedsettings.zip
Besides the network-cache I also increased the Live-TV cache a little, so TV-playback will run smoother as well.)
In the Kodi Wiki you can take a closer look at all the possible entries.
These are the entries I changed:
<advancedsettings>
 <network>
 <buffermode>1</buffermode>
 <cachemembuffersize>157286400</cachemembuffersize>
 <readbufferfactor>5</readbufferfactor>
 </network>
 <pvr>
 <minvideocachelevel>30</minvideocachelevel>
 <minaudiocachelevel>30</minaudiocachelevel>
 </pvr>
</advancedsettings>
Does outsourcing the files to a fast USB drive bring performance advantages?
The short answer is no. I tested it and couln’t notice a difference. It offered many benefits with Raspberry Pi 1, but the SD-card on Pi 2 is attached faster finally, therefore outsourcing to external usb drives isn’t necessary anymore.
If you have other tips to improve Kodis performance, feel free to write it in the comments. I will gladly complement this article with more helpful tips. 🙂


Hi there,
I followed all of your tips that I thought were applicable to my system, so not sure what made the difference, but amazing result.
I feel like maybe the pvr tweak might have been important as that’s something i’d never touched and I mainly use kodi for live streaming. Whatever it was, I’m now watching in perfect quality after a year of buffering streams and so many failed fixes.
Thanks so much!
Will these changes improve the Pi as well? I would think so, bu t I’m curious if you have had a try.
Thanks
Hi! Where I can get the XRumer 16.0 for free?
It’s the best software for SEO and SMM.
New 2017 release is perfect!
You’re heard about the game “Alone Balloon” for android? It’s really hard game, i’m could collect only 15 scores, it’s really cool 🙂
I’m really want to find friend… Let’s posting our scores on this post?
I will try out these tips as soon as possible