

Okay, there are many tutorials on Ambilight out there… but still, it was hard to find an easy way through this big jungle when I started on my research.
Which LEDs should I buy? Which ones are more popular and work well? There are questions upon questions to which you do not immediately have an answer.
In addition, many tutorials available out there are designed for the old Raspberry which brings about the question of whether they would also work for the Pi. 2.
It’s not that easy for beginners, which maybe don’t know about that stuff at all.
With this guide, I would like to explain every step it as easy as possible, all to recreate itself. If you like to craft stuff and your fingers are not all thumbs, then this project should not be a big challenge for you.
Info: Maybe some things in my photos look colorful for your taste. You can set and adjust everything later in the software according to your needs – from the brightness of the LEDs to the colour intensity, and even much more.
I had initially thought the background light might be distracting or that I would even find it annoying … but far from it! It supports your movie experience immensely and creates an incredibly pleasant atmosphere.
So what are we waiting for, let’s get started!!
What is needed?
| Hardware | Recommendation |
|---|---|
| Raspberry Pi 2 running Openelec | Go to Tutorial |
| WS2801 RGB LED-Strip | US UK |
| Power Supply 5V, 6A (up to 3,4m of LEDs) | US UK |
| Power supply 5V, 10A (up to 5,7m of LEDs) | US UK |
| Power cord with plug | US UK |
| Jumper Wires | US UK |
| Silicone Wire | US UK |
| [Optional] Corner Connectors (to avoid soldering) | Aliexpress |
| [Optional] Coupler Connectors (to avoid soldering) | Aliexpress |
| [Optional] Double Sided Mounting Tape | US UK |
| [Optional] Heat Shrink Wire Assortment | US UK |
| [Optional] Braided Sleeving Cable | Aliexpress |
| [Optional] Plastic Cable Zip Ties | US UK |
| [Optional] Epoxy Glue | US UK |
You will also need a soldering iron (US/UK) + solder. If you’ve never soldered before, don’t worry. Only some simple soldering is required for this project. 🙂
If you really dont think that you’re capable of doing this stuff by your own, you’re welcome to use a strip like this: “LED light string (US/UK)” . These can be easily attached to the TV, but the distances not as perfect as in a strip. Then again, this is entirely up to you. 😉
Raspberry Pi 2
The basic requirement is, of course, a fully equipped Raspberry Pi 2 with OpenELEC as an operating system. The instructions for this can be found here.
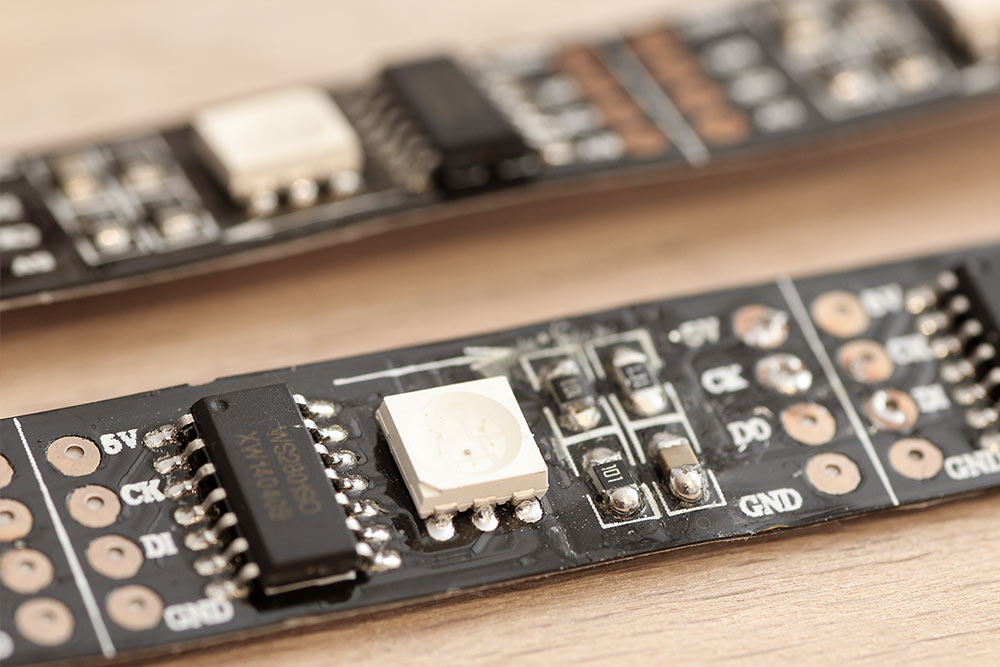
WS2801 RGB LED Strip
This LED strip provides advanced LED technology, with a very short response time, so that you do not experience any visible delay between the TV screen and the light. (I will add a video later)
It can be easily controlled with the Raspberry and is currently also the most popular choice of LEDs for ambilight projects.
Special offer! The WS2801 LED strip is really expensive here in Germany. I got mine from Aliexpress for less than half of the normal price.
WS2801 LED Strip for about US $12 per meter
3 meters costed $32 and took 3 weeks to arrive. 🙂
Update: Matthias (from the comments) found a really good deal on Aliexpress – 5 meters for only US $44!!
5m WS2801 LED Strip for about US $44
According to some comments, the packet is marked with a lower goods value so that it comes through customs. In case of doubt just ask the vendor. 🙂
Here’s another tip: the 5m strip usually doesn’t come with an additional plug, like the one I have installed for my Raspberry. You may get the plug cheaply on Aliexpress.
Questions before buying
Some of the questions were already asked in the forum. In case of doubt just open a thread in the forum. 🙂
How many meters of LED strip do I need?
Grab a measuring tape and check measurements of your TV/monitor.
Also, consider whether you want to completely line the bottom with LEDs or – like how I did it – only partially.
For instance, I used only 3 meters for my 47-inch TV.
How strong must the power supply be?
For the recommended LEDs, I need 8.64 watts per meter. My most recommended power supply 5V, 6A (US/UK) can therefore supply up to 3.4m. For more than 3.5m I would recommend using this 10A power supply (US/UK). It can support up to 5.7m of LEDs.
Can I use a “normal” power supply?
If the power part is too complicated for you, just opt for a commercially available power supply.
Although slightly more expensive, it is easier to connect.
With this adapter (5v 8A) you can support up to 4.6m of LEDs.
I also recommend getting this DC Power Jack. You can easily attach this jack to the strip, and simply insert the cable connector from the power supply into it.
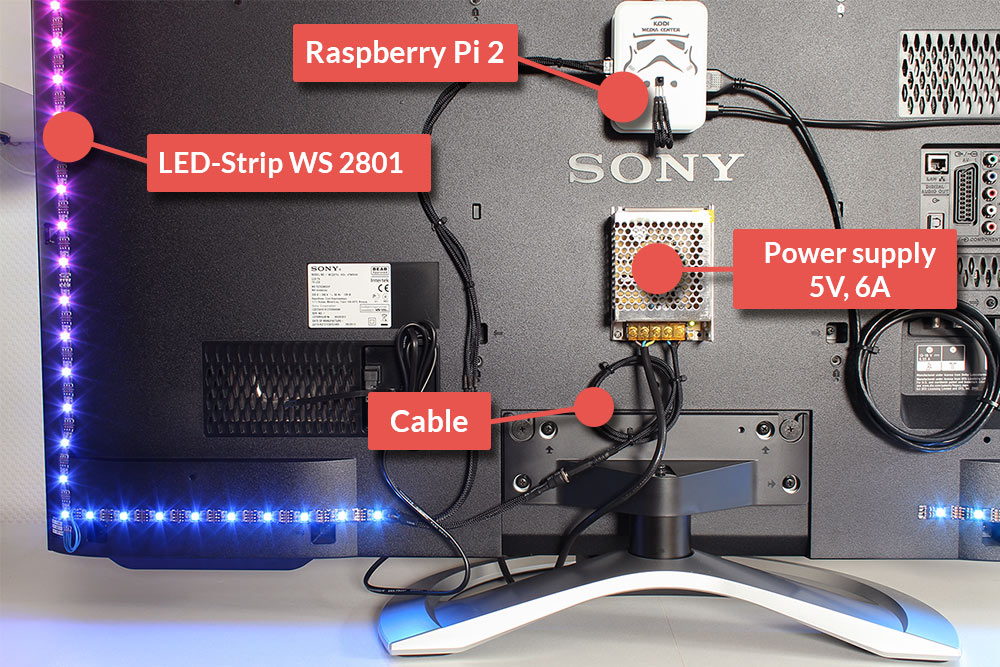
Construction Plan
How everything is connected
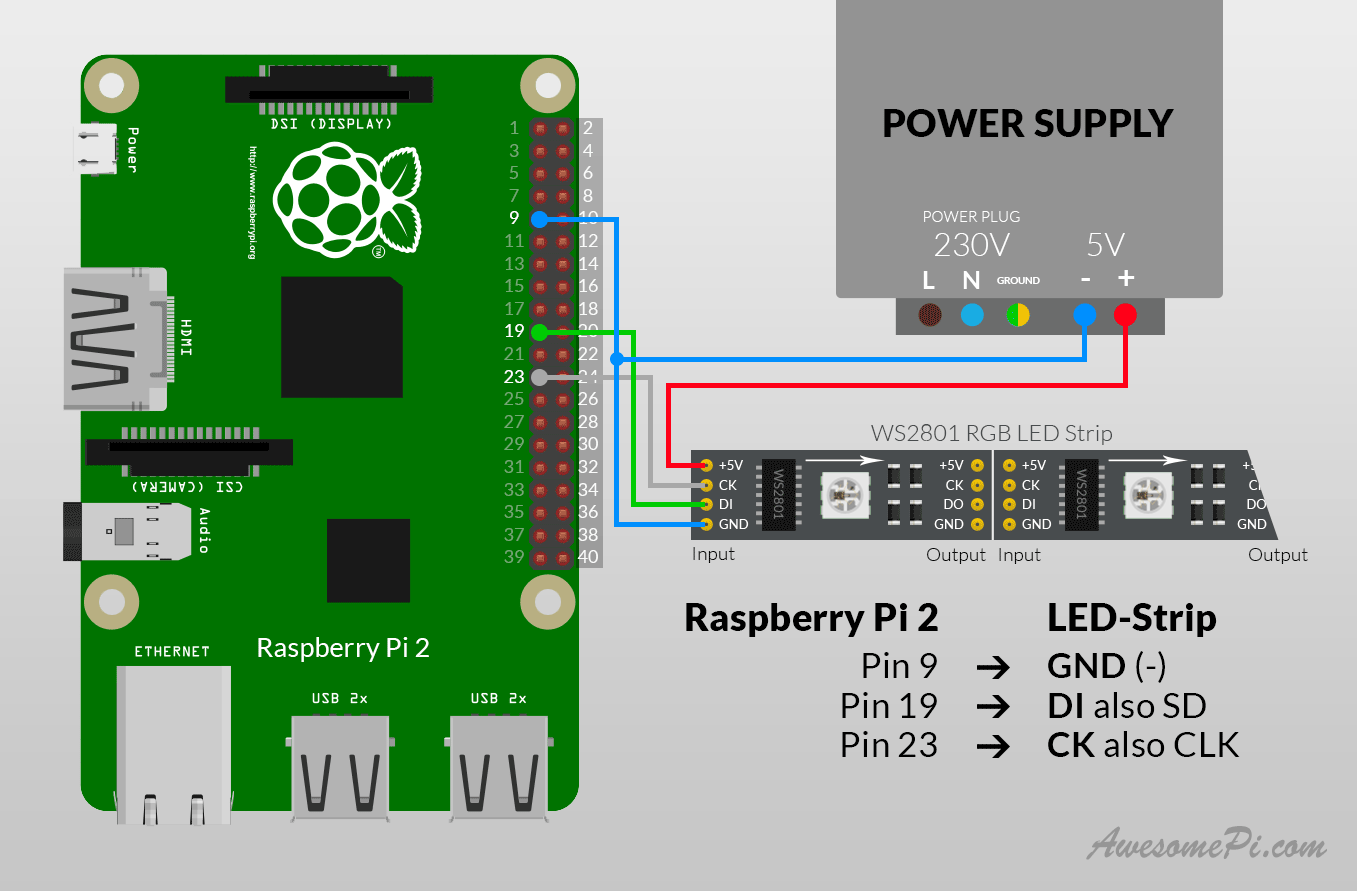
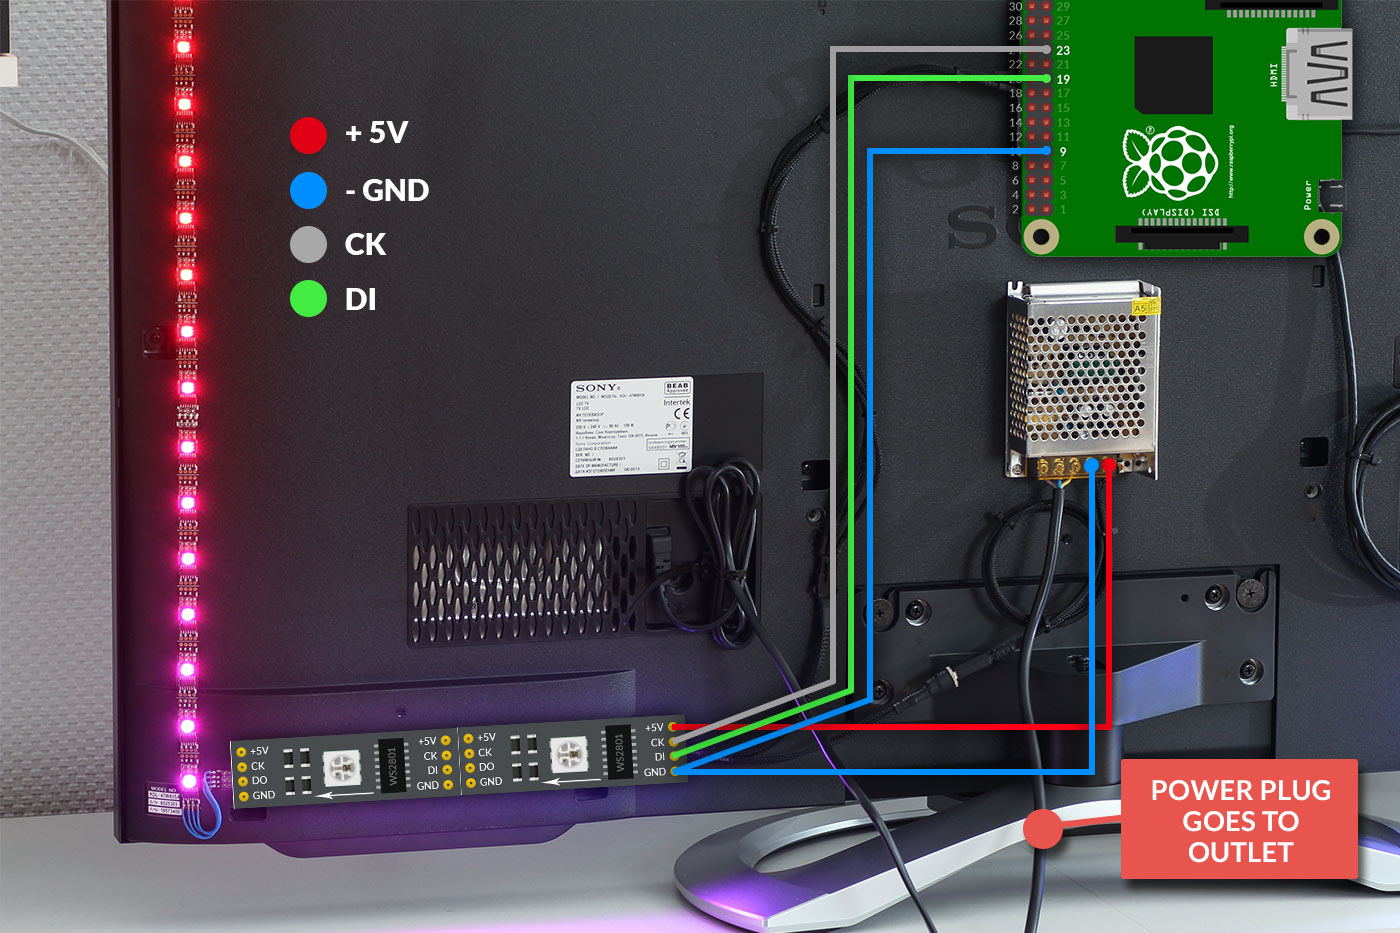
As can be clearly seen in the picture below, GND (-) connected to both the strip, as well as the Raspberry Pi. This prevents, inter alia, the LEDs flickering in adverse situations.
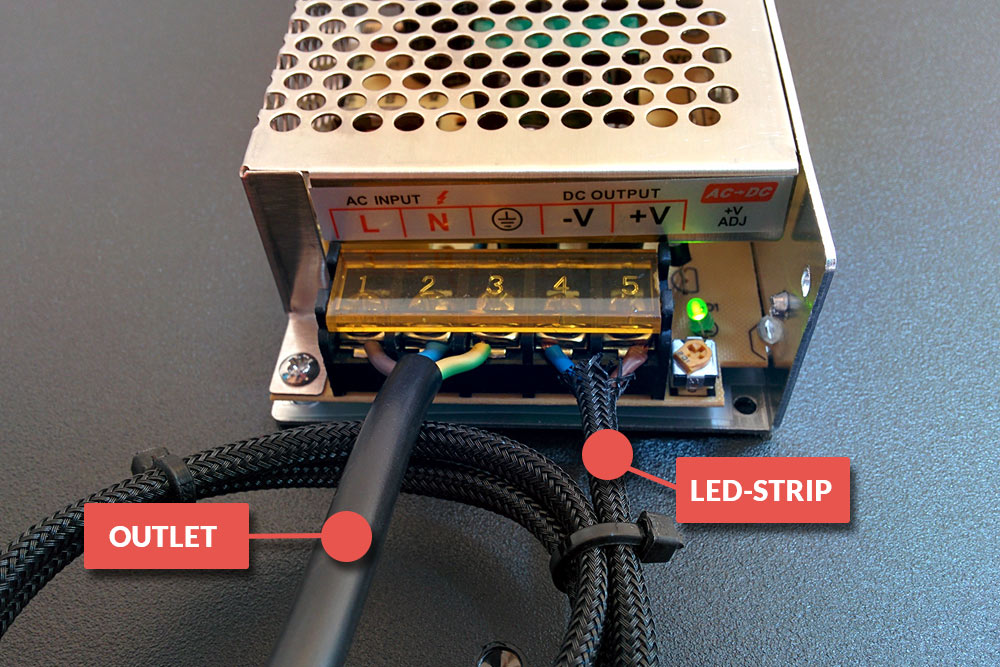
In this photo you can see how the power cord must be connected to the power supply.
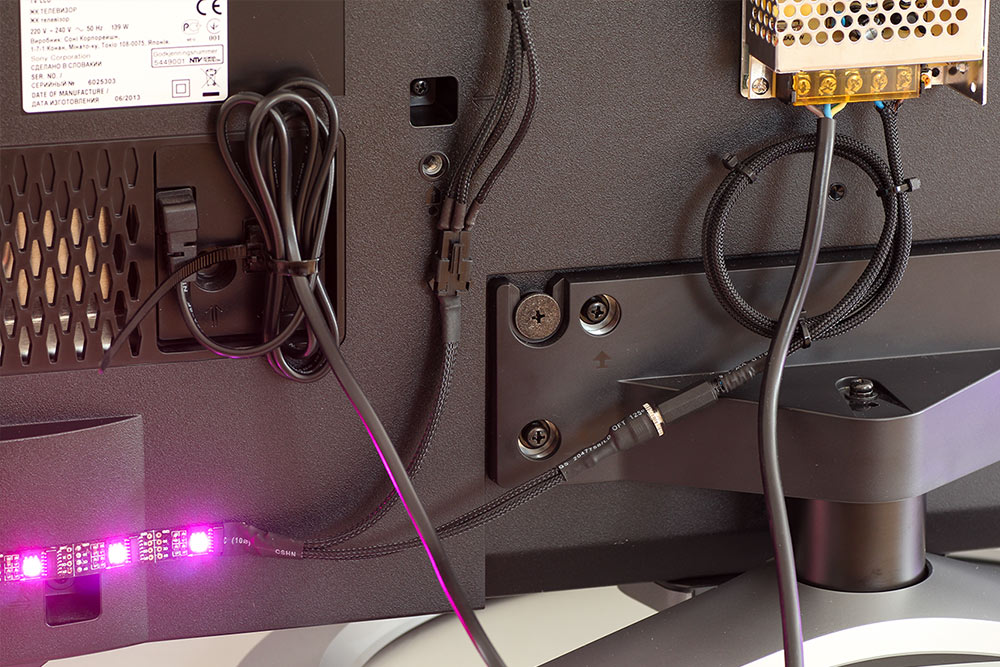
And so, everything looks finished and properly connected. 🙂

Implementation – The fun starts!
Raspberry Pi 2 Cabling
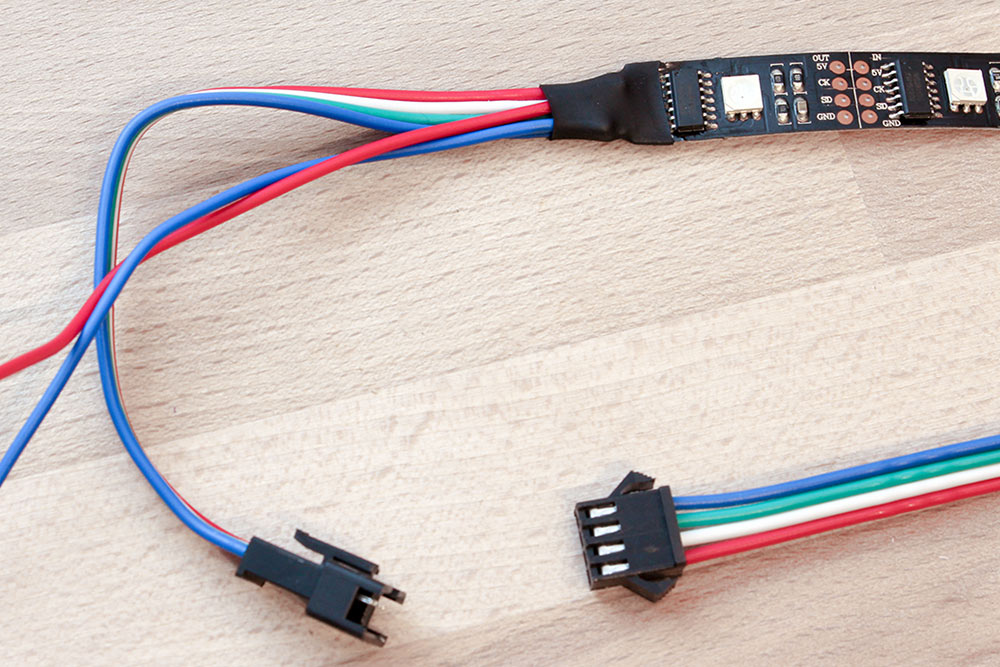
When you unwrap the LEDs, you’ll find that the ends are fitted with connectors and cables that allows to connect them easily. (if there are no plugs attached, you can buy some here very cheap)
Since these are not required, I have them removed first.
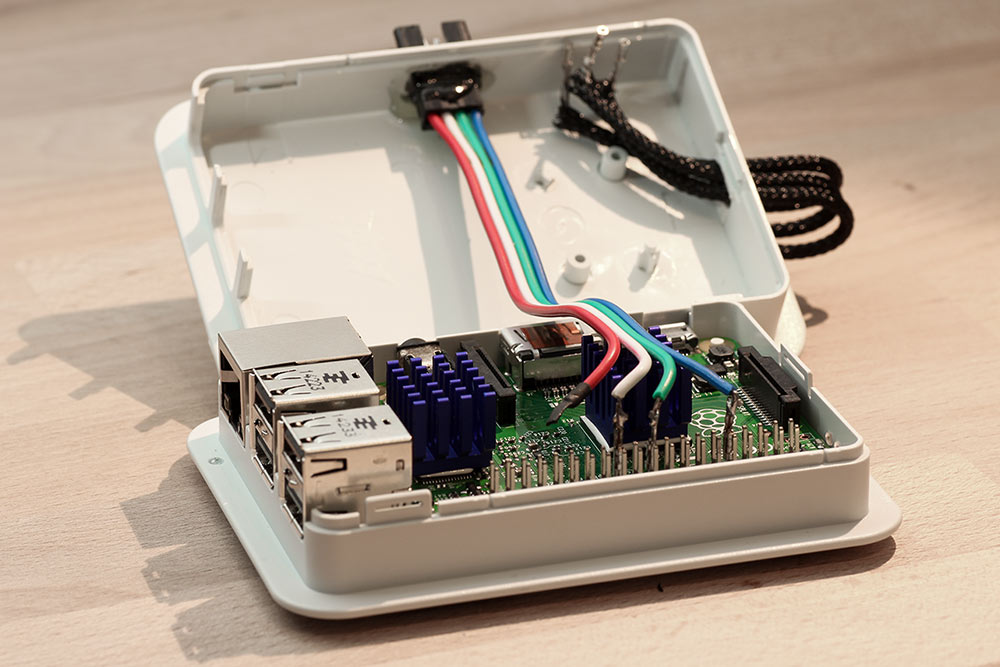
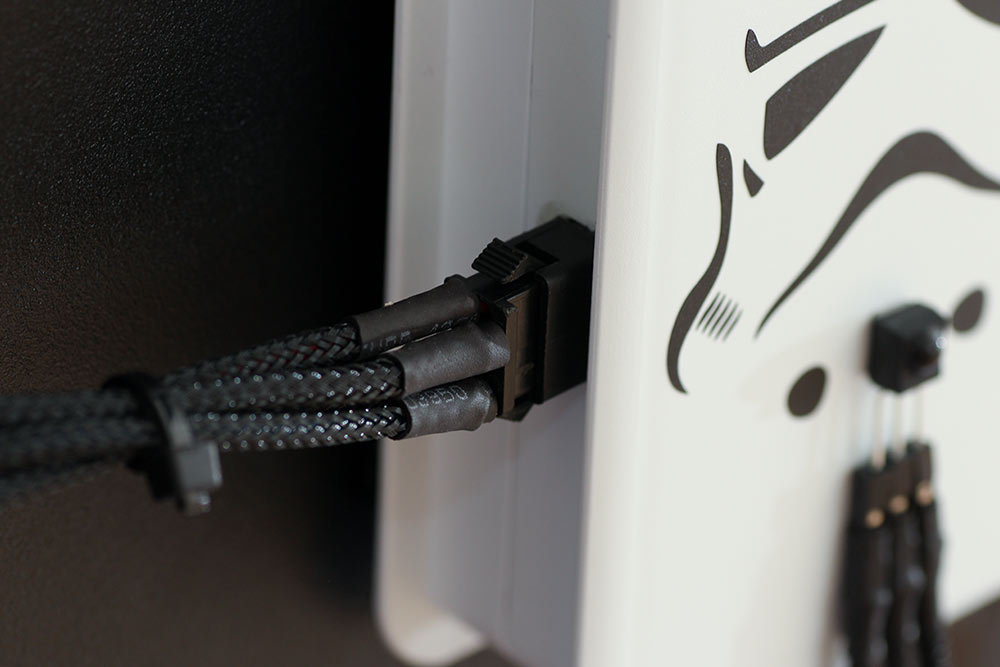
I built one of these connectors directly into my Raspberry. Simply drill a small hole and attach the plug with epoxy glue.
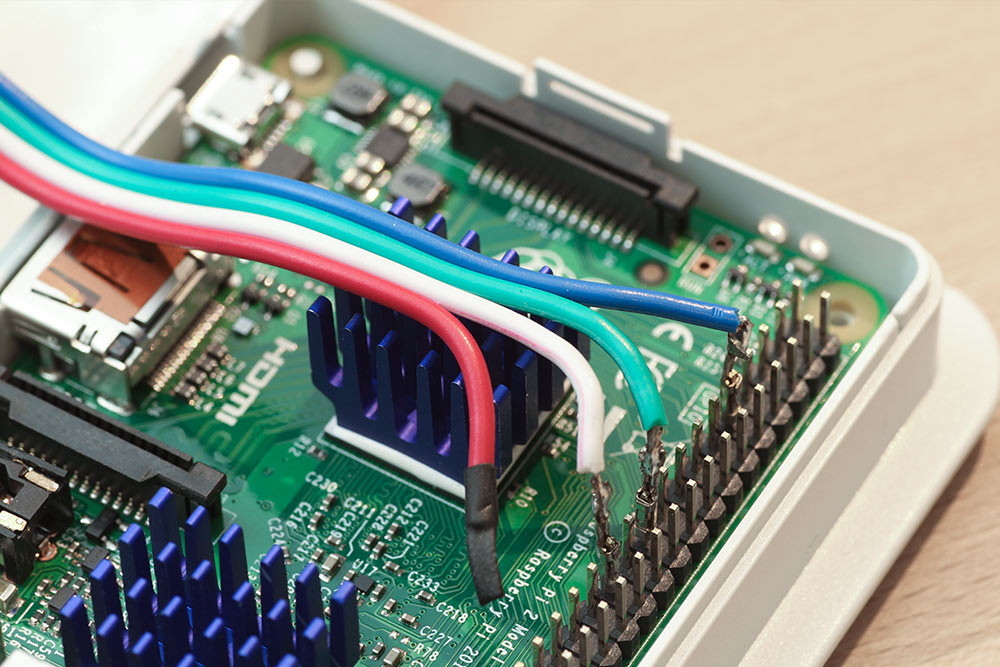
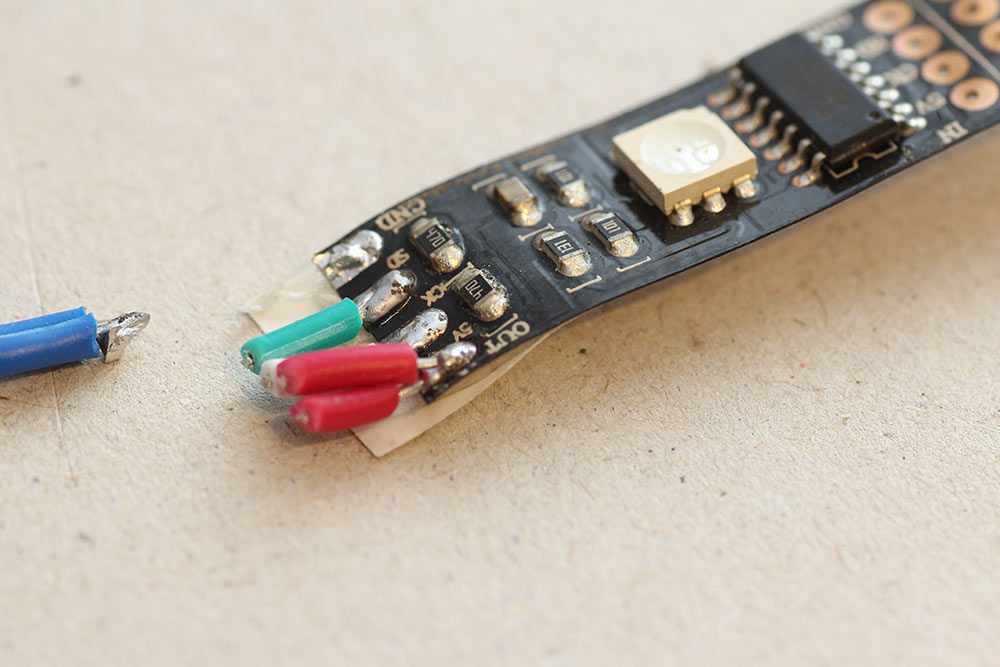
I clipped the metal connectors from this Jumper Wires and attached them to the end of the 4-wire cable to connect them to the GPIO pins.
The red wire (5V) is not connected to the pins, so I isolated it with a shrink tube.
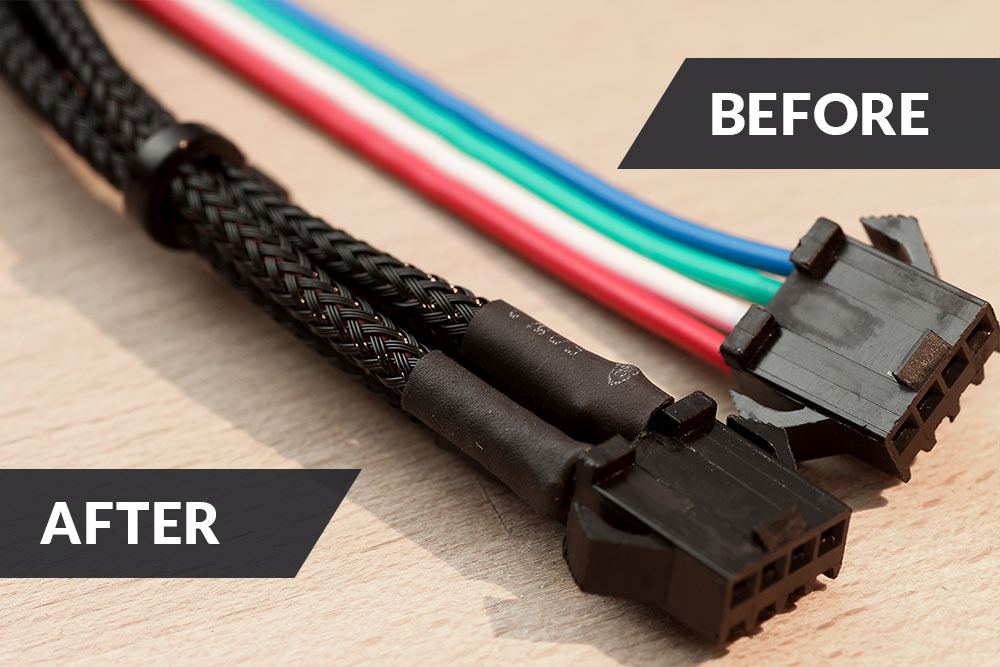
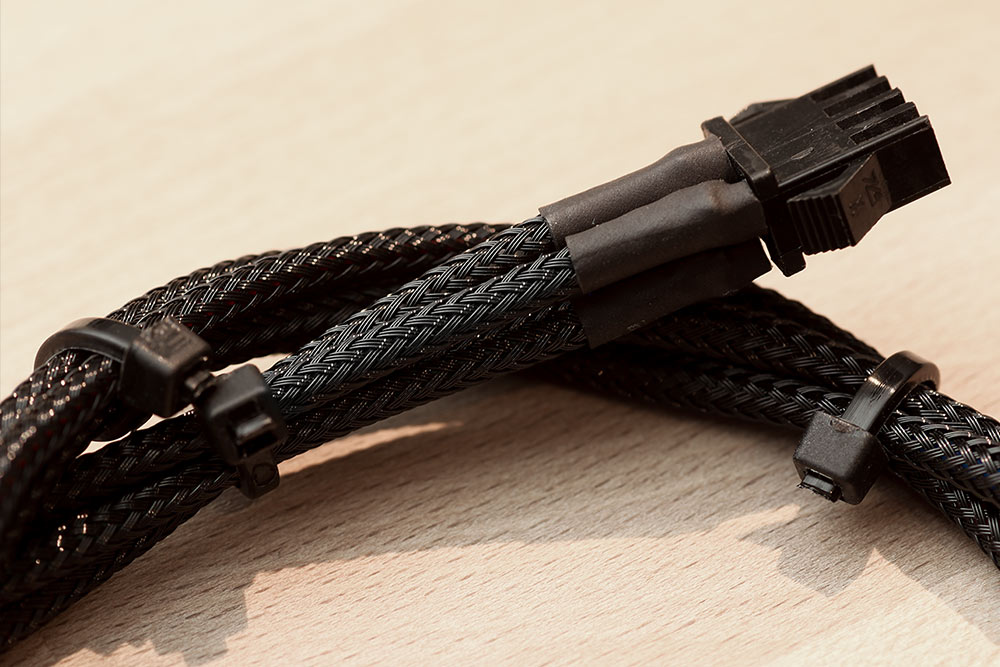
[Optional] cable sleeving
Since I put much emphasis on appearance, I sleeved all visible cables.
You may skip this step if you like, since it has no functional utility. It’s just for aesthetic appeal. 🙂
For me personally, it appeals more high-grade compared to all the mixed colorful cables.
Simply wrap the braided sleeve around the cable and fix with a shrink tube at the end.
The cables you can see here, are included when buying the led strips.
Connect the power supply properly
The power supply is well labelled, so you do not get confused Connect power supply correctly trying to connect everything.
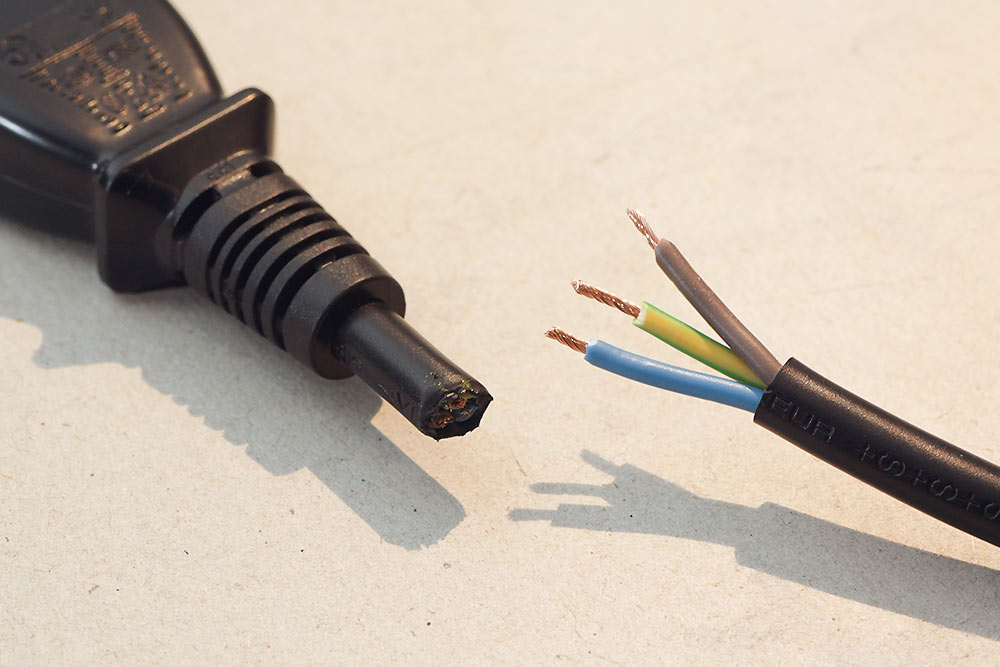
Simply connect wires of the power cord to the corresponding colours on the power supply, as you can see in my photo.
If you bought the power chord I recommended, you need to cut of the end and bare the 3 wires , which you connect to the power supply.
The voltage may decrease down the long path of LEDs strip, causing the latter ones to not shine as bright as the first few strips. Hence, for longer strips (more than 5 meters) you should supply current to not only at the front, but also to the end.
I’ve installed a plug between the power supply and LED strip, so that I’m able to turn off the LEDs manually if I wish to.
Afterwards I realized, that this kind of switch (US/UK) would have been the better solution. Or you just do it without a switch, since you unplug the ambilight completely when you’re not using it for a longer time.
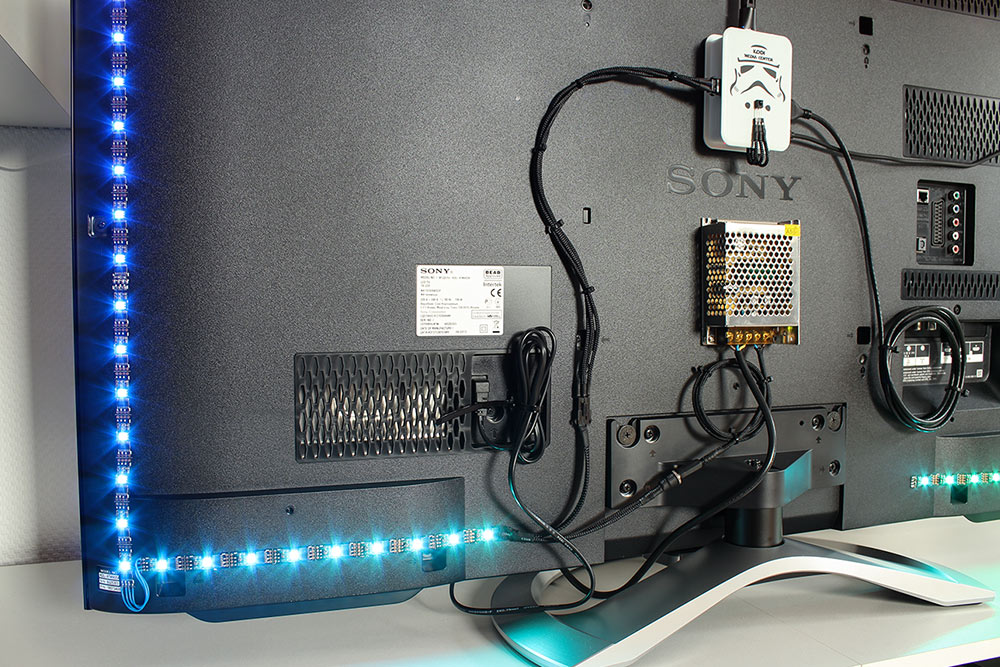
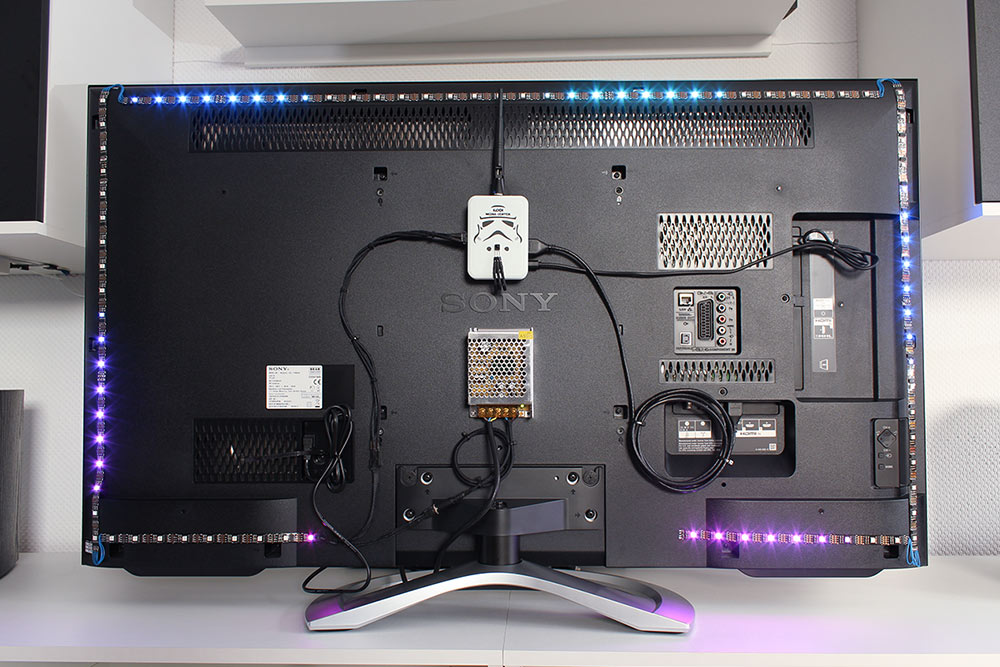
I attached the power supply to the rear of the TV with double-sided mounting tape and gathered the everything together with cable ties so that the LEDs are not blocked out by hanging cables.
Cut the LED-strips to size and solder them together
First, I removed all the connectors and cables from the LED-strips to be able to relocate them properly. The LED strips can be easily cut at the intended marks cope using scissors.
There are several possibilities to line the strips around the corners. One of which is using the special corner connectors, but the disadvantage would be that the corners of the TV would not have any LEDs.
In my opinion, connecting the LEDs by soldering is still the best solution, because of the flexible cables you can arrange the stripe more optimal. However, coupler connectors are possible, too.
Also, you need not be a professional to be able to perform this soldering. Even as a beginner, this shouldn’t be a problem.
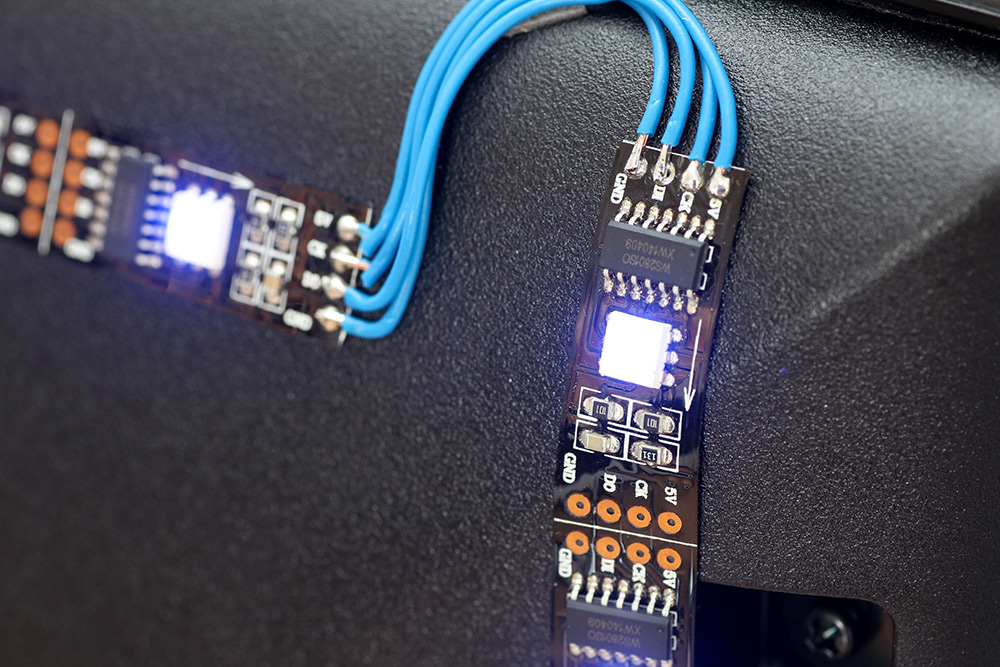
Having all strips connected, these were – thanks to the self-adhesive backing – just attached to the rear side of the TV .
Don’t worry , you can rearrange the LEDs all the time, the adhesive backing of the strips is not that strong. 🙂
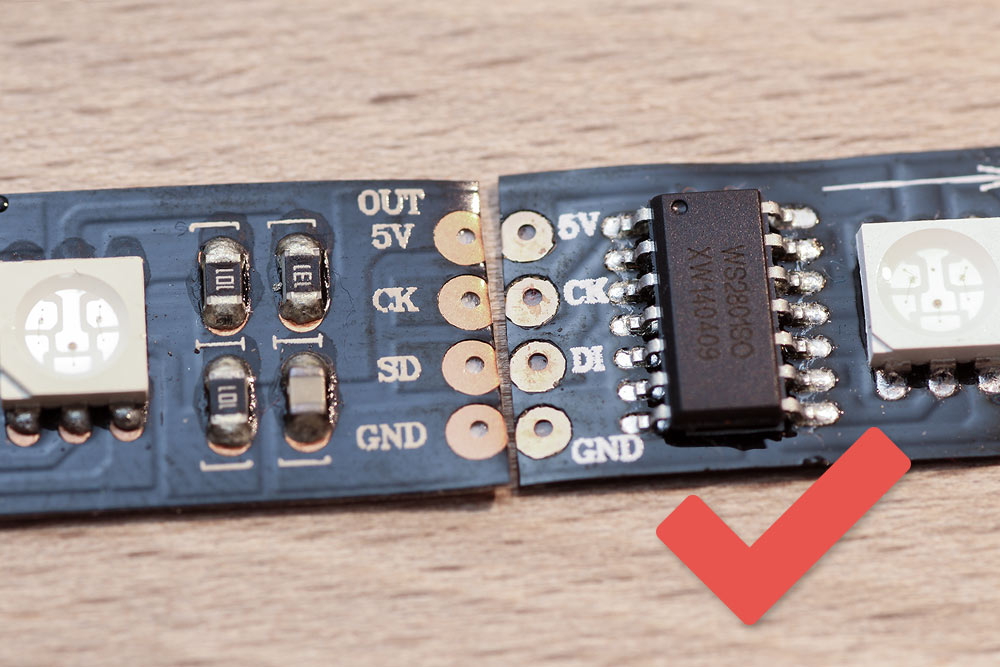
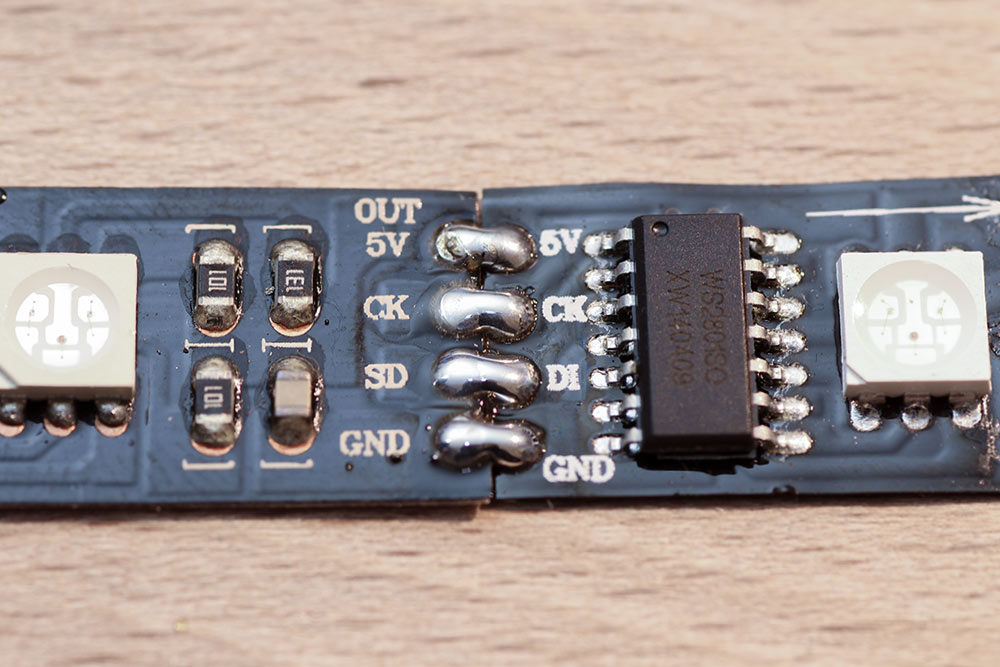
Keep attention of the direction of the strips. You can differ the front and the back side by orientating by the printed arrows. Unluckily, these arrows are not always printed on. In that case, just use the black chip as an orientation. Here the strips always begin. (Backside)
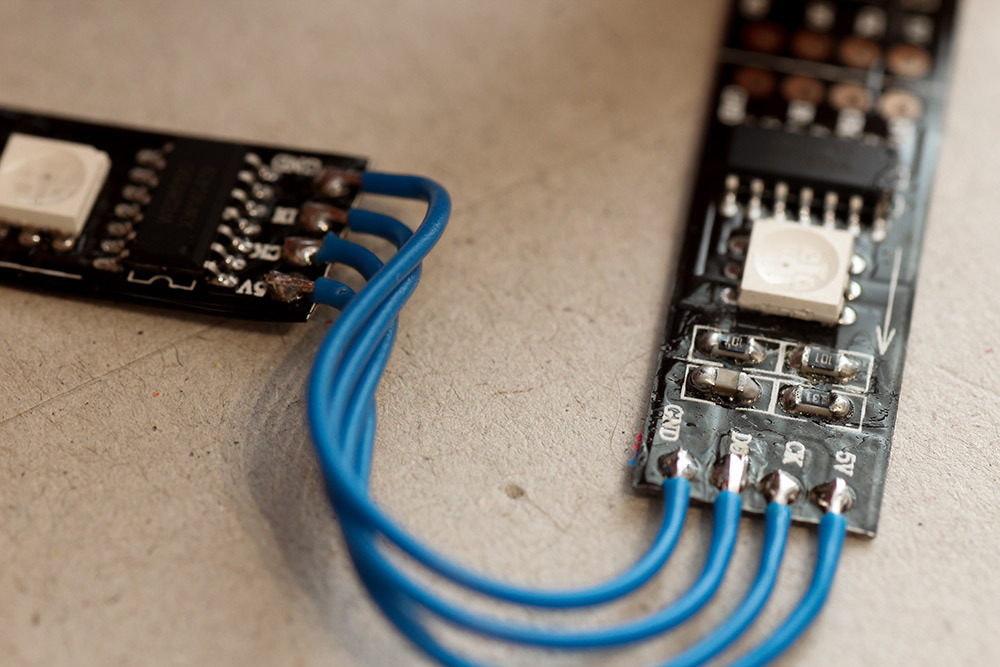
A little tip for direct soldering of the strips
When you have to solder the strips together at some points, i would recommend to cut into the round contact points using scissors. By doing this, connecting them is a lot easier.
It really isn’t as difficult as it sounds, even for first-timers. The solder pads combine almost seamlessly. 😉

Frequently Asked Questions:
Aren’t WS2812 LED strips better?
Unlike the WS2801 controller – which has 2 control lines – the WS2812 controller has only one line for controlling the LEDs.
Therefore, more processing power is necessary to address every single LED with the correct colour values. So more of an disadvantage for this project.
The driver support is also not as good . The recommended WS2801 strips are definitely the better choice!
The installed LEDs are identical in both versions.
I really do not want to solder, is there an alternative?
If you really dont think that you’re capable of doing this stuff by your own, you’re welcome to use a strip like this: “LED light string (US/UK)” and just arrange them evenly behind your TV.
It’s connected same as the strip.
Another option to avoid much soldering work, is to use these 4 Pin L-shape connectors. Instead of soldering many cables, here you can stick everything together.
The LEDs flicker when I supply with current, is it normal?
If you have only connected the stripe only give power without the data lines, the LEDs flicker in certain circumstances. This is normal since the LEDs would respond to the current if they don’t receive any colour information from the data lines.
The problem goes away when your Raspberry is online and controls the LEDs as described in Part 2 of this manual.
Is it possible to check whether all LEDs are working before soldering all of them together?
For US $7.59 you can get this small controller which you can connect to the LEDs in order to test them. There are many different colour-change programs available.
It comes in very handy for checking whether everything was properly connected.
My power supply creates a buzzing, wheezing sound. What can I do?
This problem also occurs on more expensive power supplies. In the forum you can find some solution approaches to get rid of this problem.
Many thanks to my loyal AwesomePi reader Stephan A. who has helped me a lot with his instructions!
Also, please keep in mind, that I’m not a professional electronics engineer. I just wanted to show you guys how I have implemented this project.
Since we are working with 230V , especialle as a beginner, check very carefully before you put the plug in the socket.
Is there anything else you would like to know? Then leave me a comment down below.
In case you prefer to buy your stuff on ebay, i created an extra list with my recommendations:
| Hardware | Recommendation |
|---|---|
| WS2801 RGB LED-Strip | US UK CN |
| Power Supply 5V, 6A (up to 3,4m of LEDs) | US UK CN |
| Power supply 5V, 10A (up to 5,7m of LEDs) | US UK CN |
| Power cord with plug | US UK CN |
| Jumper Wires | US UK CN |
| Silicone Wire | US UK CN |
| Thicker Cable – from Power Supply to Strip | US UK CN |
| [Optional] L-Shape Corner Connectors (without soldering) | US UK CN |
| [Optional] Coupler connectors (to avoid soldering) | US UK CN |
| [Optional] Heavy Duty Mounting Tape | US UK CN |
| [Optional] Heat Shrinks | US UK CN |
| [Optional] Braided Sleeving Cable | US UK CN |
| [Optional] Plastic Cable Zip Ties | US UK CN |
| [Optional] Epoxy Glue | US UK CN |
Please keep in mind, that all of my articles are translated from German. Therefore, I can’t rule out any mistakes. You should always doublecheck which units are used in your country.


Does this work also on OSMC?
Hi Vince, yes it will also work on OSMC. The hardware part is for both systems the same.
Can you please specify where you use jumper wires and where it’s better with the silicon wires?
I’ve used the jumper wires only to connect the strip with the GPIO pins from the Pi. You can easily slide the jumper wires over the pins so you don’t have to solder them directly to the pi.
For all the other connections I have used simple silicon wires.
Perfect thanks! I have ordered everything accordingly so I’m looking forward to getting it close to your end result! Really good guide, my favorite a far for a or Next like this!
Aki,
Could you help me please? I see three parts and I do not know where I need to start.
By the way, are you Turkish?
thanks,
Could you explain what Wires, Connectors, and which power switch you used to go from the Power Supply to the LED strip? I didn’t see them in the parts list. Thanks
Your pictures show the HDMI cord going from the Pi to the TV. How does that work? Don’t you need a Video Source being input in order to have something to provide lighting data? And if I go from the Device, Like the receiver to the Pi, how can I get the signal back out to the TV? I am confused. My questions is where the video source comes from and how it hooks up.
AC1DFOX – the Raspberry Pi is the video source. It is running a version of Kodi (used to be called XBMC) media center. This tutorial does not address using other sources (cable/satellite/gaming consoles/etc). That requires additional hardware and (I think) different software configuration.
Look here: http://www.instructables.com/id/DIY-Ambilight-with-Hyperion-Works-with-HDMIAV-Sour/
Can I connect the raspberry and the hdmi splitter directly to the power supply of the leds?, I want to buy a 5V 10A power supply
Is there a debug mode for the pi? Before purchasing the LEDs I’d like to setup the parts in principle. I already have a grabber and pi.
Also, some TVs have a scart link to go back to a vcr or dvd recorder (mines old school). Rather than split the hdmi, I think I should be able to take the scart from the TV to a composite signal. Best try it to a spare TV to test
Hello,
where did you bought this amazing raspberry case ?
ty
i found it in another your tutorial 🙂 ty and nice tutorials.
Is a Raspberry Pi model B (the first one) powerful enough to run both openelec and the ambilight? Ty!
Hi, I want to try a LED strip so i connect only 5V and GND to the power supply, without Rpi. It is normal that only first LED is emitting light. The second one in the row and rest of a strip is not even blinking.
Thank you for advice
Hi Thomas, same problem here. Cany1 can help us out.
not working 🙁 I worked at first and then I did not try again I installed it from scratch and now I am not what I did
I have EU power cord with two prongs. Do you recommend to use it or should I get three prong cable?
Hi, I can’t seem to get a 5v 8a to power the LED strip. I get a faint glow and flicker on one that makes me think they might need a higher wattage? 12v maybe? I’m using the WS2801 that you recmoended and a pre made power block and tried this with my own 5v 5a connected to a spur on the wall. same thing happens.
Any idea?
WS2801 LED Strip For DIY Ambilight For Kodi In Combination with OSMC And Hyperion On Raspberry PI 2 3 With 4 Connect 39.
I have a Raspberry PI 3, will this make much of a difference?
Hello, I have a raspberry pi 1 in my junk box, Can I use it correctly for this proyect?, thanks (Y)
Can İ use Raspberry 3 or 4 instead of raspberry 2?
Wonderful tutorial, is this still the best even in 2022? or there is some development?