
With this Tutorial you will be able to use your ambilight with every HDMI-device. You’ll be impressed by the mind blowing results! 🙂
Especially playing games on consoles will become a whole new experience. Your whole room will immerse into the atmosphere of what happens on the screen.
For example my fight against bowser in the Wii-U game “Super Mario Bros U ” seemed way more dramatic , when his fire didn’t just burn on the screen, but also on my walls.
I had to try different things out and test a lot hardware to get this satisfying results, but the effort was totally worth it !
This Howto includes following sections:
- What is required?
- Connecting everything properly
- Prepare your Raspberry Pi 2
- Create config file for Video Grabber
- Control Ambiligh-Source – Different options
Here’s just a short video of the finished project. 🙂
(Game:New Super Mario Bros. U)
Requirements
You should have finished my previous Ambilight-Howtos, because this howto is based on them.
Part 1: Hardware – How to attach the LEDs to your TV properly
Part 2: Software – How to control the colors properly using Hyperion
After finishing these howtos you have an operative ambilight-system, that only works in Kodi by now.
But now we’re gonna expand it by some HDMI-devices. 🙂
1. What is required?

| Hardware | Recommendation |
|---|---|
| USB Video Grabber | US UK |
| HDMI 2 AV Converter | US UK |
| HDMI Splitter | US UK |
| RCA Connector | US UK |
| USB Extension Cable | US UK |
| 2x HDMI-Cabel | US UK |
The videograbber and HDMI-converter are the crucial components.
Unfortunately many converters aren’t applicable for this project, thats why I recommend you to buy the exact models I provide in the shopping List.
The recommended video grabbert has a “Fushicai” chipset, which gave me the best results. Also, it doesn’ require any drivers , since they’re included in Openelec already. So the grabber works plug and play.
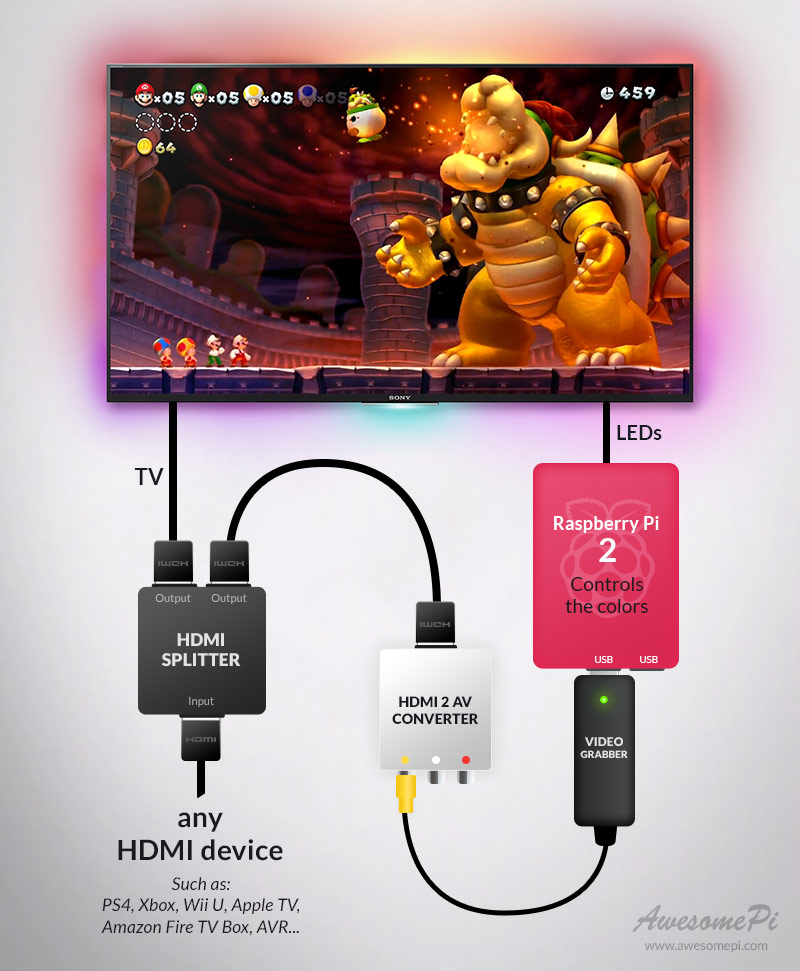
2. Connecting everything properly
Connecting itself is done pretty easily. For better understanding I created a construction plan, which shows how to connect additional hardware properly.
Please note: On the construction plan and even on my photos the HDMI-Splitter is shown without a power cable, because it’s looks more clear that way. Of course you will need to use the included power adapter to supply it with power.
Construction plan
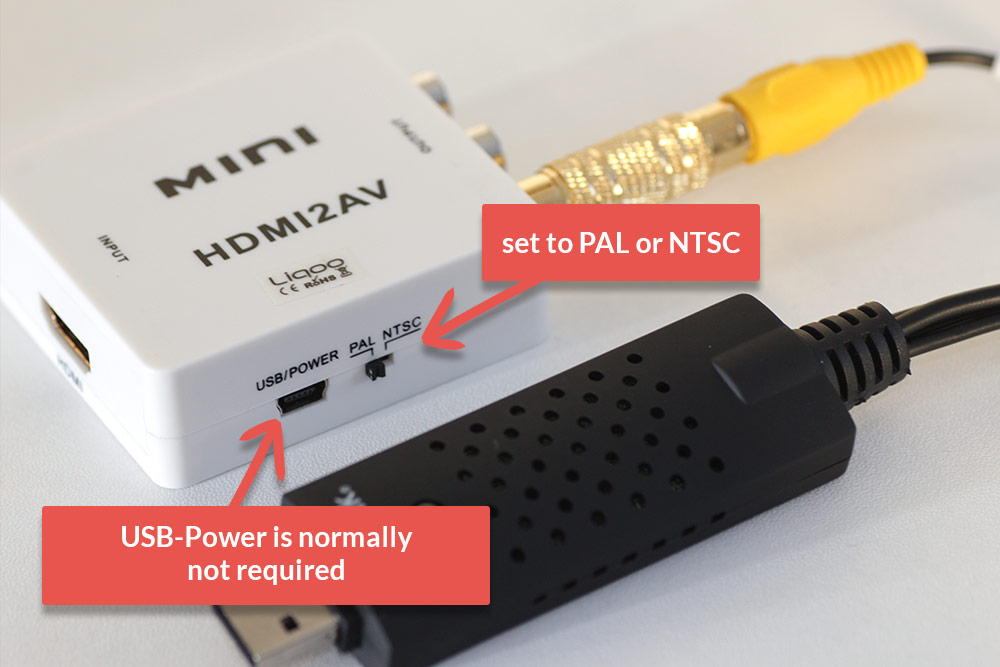
HDMI-2-AV converter
Pay attention that you have to set PAL or NTSC on the converter, depending to your region. Also there is an Mini-USB socket on the converter, but you don’t have to use it, since the HDMI cable should provide enough energy.
I tested it with and without additional energy from usb cable, and there was no difference at all. You only need to connect the yellow chinch-cable, the red and white ones are only used for audio.
Realization
And that’s how I realized everything on my TV-System:
Tro prevent, that some LEDs are covered by cables, I just fixed all devices with double-sided adhesive tape directly to the backside of the TV. If necessary, you can remove it residue-free, that’s why I chose to use it. Additionally, I fixed the long HDMI-cables with some zip ties.
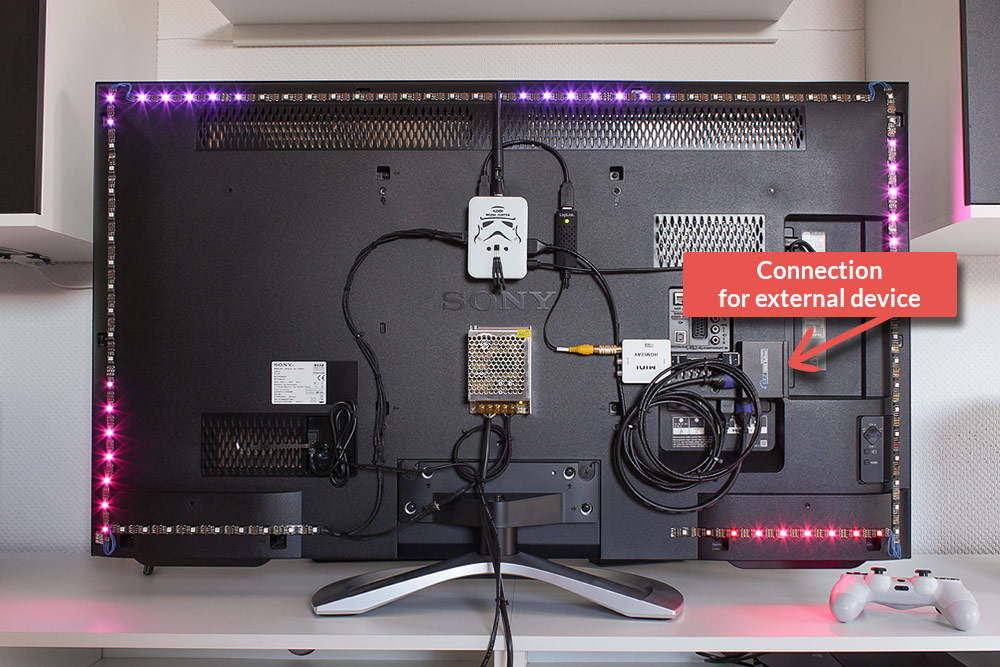
Please keep in mind, that I only present my solution here. Of course you can also just put them on the ground behind the tv , just keep attention, that no cables cover the LEDs.
3. Prepare your Raspberry Pi 2
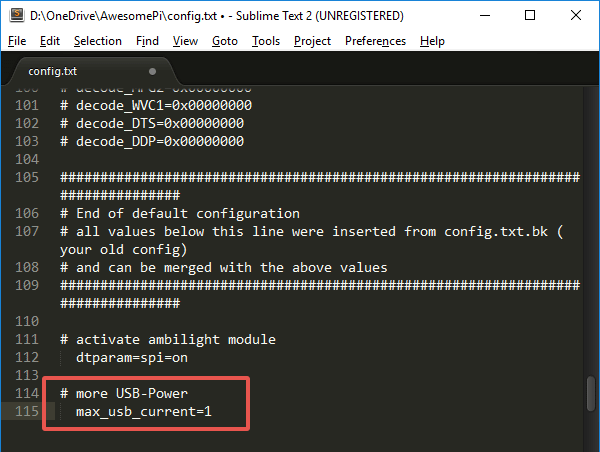
To avoid problems directly in the beginning, just optimize your config.txt for this installation. Where you can find the config.txt and how to edit it, you still know from the Part 2. 😉
You need to edit/activate following entries:
max_usb_current=1
Because the videograbber consumes much energy, it makes sense to raise the current on the USB-ports. With this entry you can do this easily.
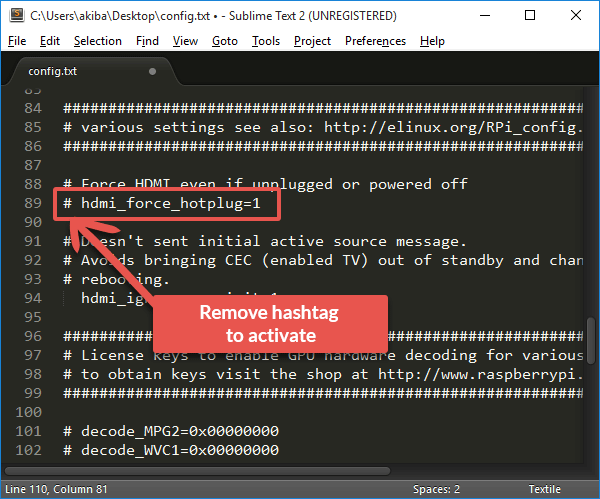
hdmi_force_hotplug=1
While you’re in the config.txt, you can also activate the function for the raspberry starting, even, when it doesn’t get a signal from the TV by HDMI-cable yet.
Especially this makes sense for people, who only want to use the Raspberry Pi for controlling external Ambilight and dont’t have a Monitor or TV directly connected to it.
The entry is also in the config.txt, you only need to remove the hash before it. Now this function will be activated, please see the screenshot.
4. Create config file for Video Grabber
In Part 2 of my ambilight howto I showed you , how to create a Hyperion config file for Kodi.
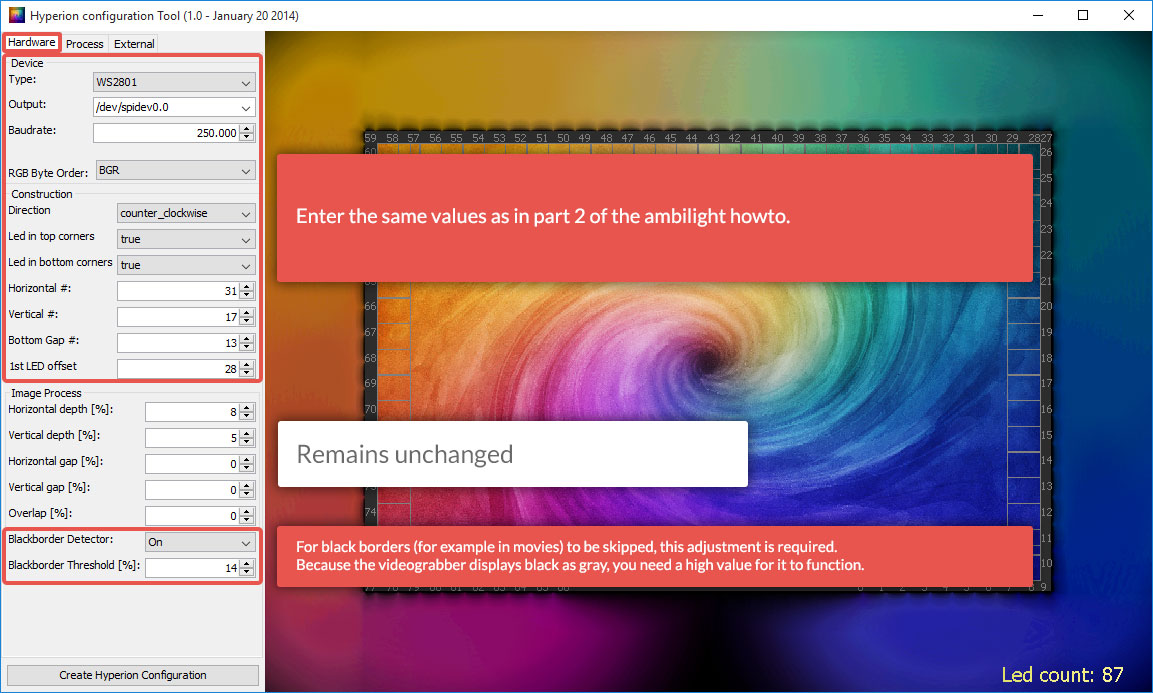
For the videograbber you need to create a separate config file with optimized settings. The procedure is pretty much the same, but you will need different values at some points.
So just start the Hyperion Cofig Tool again and generate a new config file for the videograbber.
Except for individual values like quantity, direction and beginning point of the LEDs – which need to be adjusted to your system – you can just apply all other values from my screenshots. You will have great results with them. 🙂
If you don’t like my settings, you can do finetuning and adjustments later with your smartphone easily.


After all is set correctly, just generate the config file and name it hyperion.config.grabber.json. Why it has to be named like that? I will explain in Step 5.
Open the new created hyperion.config.grabber.json in a text editor and add an additional entry for hyperion using the Video Information of the USB-Videograbber to calculate the colors for the LEDs.
Following entry is required (Values already optimized ):
    "grabber-v4l2" :
    {
        "device" : "/dev/video0",
        "input" : 0,
        "standard" : "NTSC",
        "width" : -1,
        "height" : -1,
        "frameDecimation" : 2,
        "sizeDecimation" : 4,
        "priority" : 800,
        "mode" : "2D",
        "cropLeft" : 6,
        "cropRight" : 6,
        "cropTop" : 2,
        "cropBottom" : 2,
        "redSignalThreshold" : 0.1,
        "greenSignalThreshold" : 0.1,
        "blueSignalThreshold" : 0.1
    },
Values are already optimized for the recommended Video Grabber (Fushicai-Chipset) and can be copied directly.
For you to see where to add the entry, you can just download my config file and check the proper position of it.
Download: hyperion.config.grabber.zip
After this is done, you just put the hyperion.config.grabber.json file into the configfiles-folder of Openelec Here should also be your hyperion.config.json file which you already created in the Ambilight Howto Part 2.
Copy your hyperion.config.json file, paste it again and rename it to hyperion.config.kodi.json. This step is necessary to switch between both profiles easily.
In other words, switching between “Ambilight in Kodi” and “Ambilight for external devices”.
You may be confused now why you have 3 config files in the folder , knowing we only need 2 of them. In step 5 I will explain, why it is smart to do that. For now just do it as I did. 😀
You should have 3 .json files in your configfiles folder now, as you see in my screenshot.

Important note: Please make sure the correct notation as seen on screenshots, otherwise the scripts won’t find the files later.
5. Control Ambiligh-Source – Different options
In this chapter I present 3 different solutions to control the videograbber.
Hier biete ich 3 Lösungen an um den Videograbber zu steuern. There should be something to suit everybody. 🙂
5.1 Starting Videograbber automatically
As already written, there should be 3 Hyperion config files in the openelec Configfiles folder. The hyperion.config.json is the file, which is automatically loaded when the Raspberry Pi boots up.
Right now, this is your config file for kodi. The videograbber for external devices won’t work for now. So if you want the videograbber to be activated when booting up, then just replace the whole content of hyperion.config.json with content from hyperion.config.grabber.json . At the next start of your raspberry the videograbber will be activated.
For some of you, who don’t want to use Kodi at all, this would be the perfect solution. The Raspberry will start the video grabber automatically and provide the external device with light. There’s nothing more to do at this point.
5.2 Controlling Ambilight-Source directly in Kodi
Here you get a really cool soultion to switch directily between “Ambilight in Kodi” and Ambilight für external devices directly within Kodi.
For that, you need to “misuse” the “Favourite” menue in Kodi, where you need to add 3 short entries to use a script, which switches between the different Hyperion config files or turns off the ambilight completely.
Download: control_hyperion.zip
In this zip-file you will find 3 scripts and a customized favourites.xml file. You’ll need to put all 4 files into your Kodi Userdata folder and replace the existing favourites.xml.

After a reboot you will find the new entries in your favourites menu. You can use the entries to control your ambilight-source comfortably now.

For the scripts to work, you have to make sure the filenames of Hyperion config files match exactly. (hyperion.config.grabber.json, hyperion.config.kodi.json).
5.3 Controlling Ambilight-Source with your remote
Info: If someone never dealt with remote controls in Kodi, I would strongly recomment this article.
If you have enough unused buttons on your remote control, you can execute the scripts directly with your remote control.
Here you can see an example of my remote.xml , for better understanding how to do the entries.

To avoid typing errors, here’s the code for the buttons for you to copy:
system.exec("/storage/.kodi/userdata/activate_hyperion_kodi.sh")
system.exec("/storage/.kodi/userdata/activate_hyperion_grabber.sh")
system.exec("/storage/.kodi/userdata/turnoff_hyperion.sh")
After this is done, you can control your ambilight-system comfortably by pressing buttons on your remote control.
Switch through all functions with just one button
If you don’t want to waste 3 butttons, I provide you a script for you. With this you can switch through all options with just one button.
Pressing it once, you’ll activate ambilight for external devices, pressing it the second time, you activate ambilight in Kodi and at the third press you turn the ambilight off.
Just download this script, unzip it and put the hyperion_toggle_switch.sh into the Userdata folder.
Download: hyperion_toggle_switch.zip
You assign yor button with this command:
system.exec("/storage/.kodi/userdata/hyperion_toggle_switch.sh")
Done! 🙂
Ps: In case you prefer to buy some of my recommendated products on ebay, here are the links:
| Hardware | Recommendation |
|---|---|
| USB-Videograbber | US UK CN |
| HDMI to AV Converter | US UK CN |
| HDMI-Splitter | US UK CN |
| RCA-Connector | US UK CN |
| USB-Extension Cable | US UK CN |
| 2x HDMI-Kabel | US UK CN |


Great how-to!
I’ll probably do this also, I love ambilight!
How much did the project cost you?
Thanks,
Thijs
Hello Thijs,
thanks a lot!
The abilight from Part 1 was about 100$,
the extra stuff for gaming consoles was 75 $ extra.
It depens on what you already have,
because I had cables, heatshrinks etc. at home before I started.
Best regards
Henry
This series of articles is probably the best one I’ve read while researching ambilight/hyperion. Nice work. I had already set mine up for Kodi (after much research and frustration) when I found this and I wish I had seen yours first!
Now I’ve ordered the stuff to be able to use it on the rest of my stuff (xbox/cable tv) – I’ve also adding an hdmi switch so I can use more than one source (cheap and pretty highly rated):
https://www.amazon.com/gp/product/B018BFN7FA/ref=as_li_qf_sp_asin_il_tl?ie=UTF8&tag=awes0ae-20&camp=1789&creative=9325&linkCode=as2&creativeASIN=B018BFN7FA&linkId=93937d5385032449b852669a5dd1c30b
Oh – I forgot I was going to ask you: Do you know if there’s a way to turn off hyperion when kodi is in “sleep” mode? (Meaning the screensaver is on)
I wonder if there’s a way to disable and relaunch it based on whether the screensaver is active using something like your custom favorites that you detailed in step 5.2.
If the screensaver is set to ‘Black’, then the leds turn off. I have mine to turn off after 1 minute
Does it support 4k HDR content support. The HDMI splitters don’t do a good job splitting 4k content. Please let me know.
Hi.Thanx for this effective tutorial. I just wanna ask tech. question . When I connect my laptop to hdmi splitter, I can not get any action on leds but with satelite receiver it works . How Im gonna fix this issue I mean using with pc
What do you think would be the best solution for my setup?
I currently have an AMP with a Raspberry Pi (Kodi), Xbox One, Playstation4, TV satellite box all plugged into it. There’s 1 output from my AMP which goes directly to the TV. Do I need to put another Raspberry Pi between my TV and Amp to control the lights?
Here is a very quick example of my problem…
http://s33.postimg.org/47q47y9v3/my_setup.png
As I only want to use my AMP to change inputs I think i’m going to have to have two raspberry pi’s?
Your ambilight tutorial is so good that I am using openelec with it now
It works with Raspeberry pi 3?
Hello I’m really impressed by result of your DIY Ambilight Project. Especially I liked soft color switching. I want to do Ambilight system for my 29″ Ultrawide Monitor that I’m just using with my PC. I think I should use your last project that you told in part 3. But I’m confused about several topic:
1- Firstly my PC running on 2560x1080p and 75 hz. Is it will be a problem? Because I’m researching now for HDMI splitters and USB Video Grabbers. They all have Full HD label. But My Resolution and Refresh Rate is higher than standarts of Full HD.
2- Secondly I think HDMI splitter causes decrementing on Video Quality. I don’t want to have worse quality. What are you thinking about this topic?
3- And as I told my monitor is 29″ so I have a small working area and I have to put a lot of devices to back of my monitor. I think it won’t a good view and actually I don’t know that my work space enough for HDMI splitters USB Video Grabbers etc. Is there any way doing this project with less device?
nice article! thanks for the effort.
Do you know how can i use the fev menu to control ambilight from kodi in windows? i run kodi in intel NUC. and ambilight runs in RPi2.
I would like to know as well
same with me.. ambilight works fine with kodi, but when tried with other hdmi (Xbox one) ambilight doesnt switch on), usbgrabber is detecting as utv007 but still nothing, any fix for external HDMI please..?
Hi! I’m getting everything I need to build this right now, (first Raspberry Pi project–super excited!), and I just wanted to ask one quick question: Does it have to be a Raspberry Pi 2, or will this all work smoothly on the Raspberry Pi 3?
Thanks!
It works with the Pi 3, although I’m having problems with the setup right now…
hi! will this work with Raspberry pi 1 Model B ?( The first model, not the 2 or 3)